1.1. Why is This Book Necessary?
In March 2006, David A. Patterson wrote an article entitled "Computer science education in the 21st century." David A. Patterson was, at the time, the president of the Association for Computer Machinery, the world's largest educational and scientific computing society. In this article — which, sadly, you cannot read unless you are an ACM member — he advocated for fundamental changes to how computer science is taught. One of the changes to the standard undergraduate computer science curriculum that he advocated for was the inclusion of courses in open sourcesoftwaredevelopment.
One might think that such a clarion call, made by someone of such obvious influence, would generate a groundswell of enthusiasm. When the president of the ACM proclaims that it is "time to teach open source development," the world of academia must certainly follow, yes?
It's a little more complicated than that.
We've spent a lot of time over the past few years talking to computer science professors. Mostly we've asked lots of questions -- actually, the same ones over and over.
Do you use open source software in your classes? (Increasingly.)
Are your students interested in open source? (Increasingly.)
Do you or your students participate in open source software? (Rarely.)
Do you teach open source development practices? (Almost never.)
For these last two, the follow-up question is, invariably, "why not?"
And the answer is, invariably, "because it's hard."
There are good reasons why professors don't teach the practice of open source. It's easy for open source advocates to explain away these reasons. At a certain point, though, one must accept the idea that most professors are well-intentioned, but bound by circumstances that make it frustratingly difficult to introduce students to open source development.
So why bother?
The answer is simple: the skills required to succeed in an open source software project are the exact same skills required to succeed in any large software project. The biggest difference is that, with just a bit of guidance, anyone can build their software skills in the open source world.
We hope that this textbook helps provide that guidance to a whole generation of students.
1.2. Why Traditional Student Projects Are Ineffective
Almost every modern computer science degree program requires its students to complete a Big Project. Sometimes it's the "Senior Project," and sometimes it's the "Capstone Project." Whatever it's called, the purpose of this Big Project is to expose students to "real" software engineering practices.
In other words, this typically translates to "coding with other people." Unfortunately, up until this point in a student's education, this has usually been discouraged as "cheating."
The problem is that these Big Projects actually tend to focus on extremely bounded problems. Most of the time, a small team of students works on a small project for a semester, and the result is, quite naturally, a small project. While good learning can take place in a small project, it actually does very little to prepare students to work on Really Big Projects.
To find Really Big Projects, one must venture out into the world, where there are Really Big Problems. The real world is full of gigantic applications that require
build systems and
revision control and
defect tracking and prioritization of work. They are written in languages that one may or may not know, by people one may or may not ever meet. And in order to successfully navigate through these Really Big Projects, the novice
developer must possess one skill above all others: the ability, in the words of our colleague
David Humphrey, to be "productively lost."
The great advantage of open source, for the learner, is that the Really Big Projects of the open source world provide unparalleled opportunities to be productively lost. Complex codebases are immediately accessible by anyone who wants to participate. This accessibility is crucial to the learner, as participating in an activity is by far the most effective way to learn that activity.
Sooner or later, the coder aspirant must work at scale, with teammates. Open source provides that opportunity in a way that nothing else can.
1.3. Using This Textbook to Get Started
This textbook exists because professors asked for it, but the textbook's fundamental approach -- teaching the basic skills of open source development incrementally, through real involvement in meaningful projects -- should make it suitable for self-learners as well. Regardless of whether you are using this text as part of a course or working with it on your own, you should work through it while adhering to the principles of contributing, calling for help, and being bold.
First, always be contributing. The majority of exercises in this textbook are designed to lead to direct and useful contributions to a project, no matter how small. Even a simple act, such as adding comments to a part of the code you don't understand, can add real value to a project; that's the great thing about community developed software. Contribution matters, and legitimate contributions, no matter how small, are always welcome.
Second, call for help when you're stuck. If you have trouble with an exercise — and at some point you will — look to your fellow contributors for help. Your chosen project has mechanisms for getting in touch with the more advanced developers: mailing lists, or IRC channels, or forums, or all of the above. Communicating with those around you is not only "not cheating," it's key to establishing greater understanding. Keep this in mind, though: in the real world, people are most likely to help those who are trying to help themselves. Before you ask someone a question on IRC, ask the same question of Google. A good rule of thumb: if you can't figure something out in 15 minutes of searching the Internet, it's reasonable to ask for a bit of help.
And third,
be bold. Try things. Break stuff. Don't be afraid to play around with the code; it's only code, after all, and if you break something, you can always revert to the previous version. If you reach a point at which you think you're ready to make a contribution of some kind, then offer to help on the project mailing list. The answer will usually be "go ahead, thanks!" Sometimes the offer will be "no thanks, and here's why," and you'll learn something. Occasionally the answer will be "no, go away," which is also useful, since it tells you to invest your energies into another project. Sometimes the answer may be silence; don't be afraid to keep asking until you get an answer, or even plunge ahead without one. Learn the rules of the project and follow them; if the rules of the project are vague or confusing, you can
help to make them clear. This alone can be a critical contribution, as it clearly helps those who come along after you.
In most educational contexts, you have likely been "trained" to wait for permission before doing anything not previously specified, but you must avoid letting that get in the way of your progress when engaging with an open source project. When the rules are unclear, don't sit on your hands. Do your best to help the project. It's better to do something wrong, and learn from it, than to do nothing at all.
1.4. A Note on Terminology - Free Versus Open Source
This is, first and foremost, a textbook about how to create software collaboratively, using a community development model.
Some people call the result of such work by the name free software. Some people call it open source software. Some folks call it both: free and open source software. Some people throw in libre to specify a particular meaning of free, and call it free/libre open source software. Frequently one will see these abbreviated into the terms FOSS or FLOSS.
There are valid reasons for the usage of these different terms in different contexts, but for the sake of simplicity, we use the term FOSS primarily in this book, with the tacit understanding that all terms mean virtually the same thing in our chosen context.
Enough of the pep talk. It's time to get started.
Chapter 2. Introduction_to_Free_and_Open_Source_Software
Free and Open Source Software, or FOSS for short, is software for which the source code can be freely shared, with anyone, for any purpose.
There are more rigorous definitions, and there are many licenses that help to ensure these freedoms in subtly different ways. We examine these details later in the book. For now, focus on this simple idea: the freedom to share source code is the essential element of free and open source software.
At the end of this chapter, you should:
Understand the difference between source code and binary code;
Understand some of the benefits of using FOSS;
Understand some of the benefits of participating in FOSS projects;
Have an idea of some FOSS projects that might interest you, and why;
Have the beginning of your own FOSS portfolio.
2.2. Why does FOSS matter to me?
Free and Open Source Software matters because it's real, and because you, the student, can see in to the guts of it. And when you go out into the real world, looking for a job as a Real Software Developer, you have a tremendous advantage if you can prove that you have experience in real software projects -- ugly, messy, confusing, gigantic software projects.
Without FOSS, getting experience in real software projects requires access, and probably permission, to see the source code. For students, that access is usually limited to those who can get internships or positions in co-op programs. Not everyone has the opportunity to spend the summer interning with a company that does large-scale software development, meaning that a vanishingly small number of students have the opportunity to work with large (closed) codebases. And even if they do, those students typically cannot show their work to anyone outside of the sponsoring company.
In the world of FOSS, the source code is available to anyone who wants to see it. Not only is the source code available -- also available are all of the interesting challenges that go with managing large software projects. In this book, we explore a number of these challenges and help you engage in them in direct and practical ways.
How do fifteen software engineers work on the same piece of software together? When two software engineers decide independently to edit the same line of code, what happens? In the world of FOSS, we make use of version control systems to help avoid these kinds of problems. Without version control, it's a disaster, which is why we cover version control in the chapter entitled
Chapter 4, Getting the Code.
Complex software is built in different
modules. Those modules have different names in every language --
packages,
libraries, etc. -- but modularity is always introduced to help manage the complexity of large projects. One software project may
import dozens, or even hundreds, of previously built software modules. What happens when one of those modules changes? If you don't know how those modules fit together, it's a disaster. Which is why we cover
build management in the chapter entitled
Chapter 5, Building the Code.
There's also a lot more to good software than code. How do you make sure people have the resources and knowledge they need to find and run (and contribute to) the software that you make? Beautiful code that doesn't get used is just as useful as code that was never written. Which is why we cover
documentation in the chapter entitled
Chapter 8, Explaining the Code.
Most code is buggy. Even the very best code can still have bugs, which means the ability to find and eliminate bugs is a critical skill for all software engineers. If you don't know how to find the bugs your users find, you're in trouble. Which is why we cover bug hunting in the chapter entitled
Chapter 6, Debugging_the_Code, and we cover the mechanics of fixing code in the chapter entitled
Chapter 7, Fixing_the_Code.
2.2.5. Experiencing the Software Lifecycle
There's a saying about software programs: they're never finished, only abandoned. There's always more work to do to improve any software project. The thing that makes FOSS so unique, and so interesting to the aspiring programmer, is that anyone can participate in a FOSS project. Most large projects can benefit from contribution by even novice programmers. There are also more FOSS projects than ever before, with an almost unlimited number of interesting problems. Want to learn how web browsers work? Hack on Firefox. Want to put together an awesome multilingual book reader for the blind? Hack on espeak.
The key is to find a project that interests you.
2.2.6. Exercise - Finding a Cool Project
Imagine that you have just been hired as a programmer for FOSS Inc., and your manager has told you that you must spend 20% of your time to work on a FOSS project that matters to you.
First, search the web and find sites that host FOSS projects. There are many. Bookmark these so that you can come back to them later.
Second, browse through several of these sites and find one or more projects that are interesting to you. You might be interested in projects that benefit others. You might be interested in tools that support work that you do. Or, it might be that you might find something strikes your fancy that you never considered before! Take this as an opportunity to explore broadly.
After you find a project, write a blog post about it. At this point, the most important thing you can probably do is to explain why the project is interesting to you.
If you don't have a blog, set one up for free! Visit
Blogger or
Wordpress; setting up a new blog is easy. Blogs are widely used in the FOSS world by project members to share what they're doing. Your voice will become one of many, and who knows -- your blog might become a resource that other students later look to for inspiration when they are looking for projects to get involved in!
2.3. What is source code?
Let's start with an explanation of source code. One cannot understand open source without first understanding source.
Source code is a set of instructions for computers that is meant to be read and written by humans.
Here's an example of source code, in the C programming language, for a simple, but complete, program.
#include <stdio.h>
main() { for(;;) { printf ("Hello World!\n"); } }
In order to run this program, it must be compiled into machine code. First, we save the program into a file called hello.c. Then, we compile it:
gcc -o hello hello.c
The command is gcc, which stands for "GNU Compiler Collection." The flag -o sets the name of the program that we are about to generate; here, we've decided to call it hello. The last argument is the name of the source file that we want to compile (hello.c). After compiling the program, you should be able to run it. To run the program, type: ./hello at the prompt. This says "run the program called hello that is in the current directory." When run, this program will print Hello World! until we kill the program. Hold down the CTRL key and press the C key to kill the program's execution.
At this point, you have two files in your directory: hello.c, the source code, and hello, the program binary. That binary is a piece of that machine code. You can open it with a program called hexdump that will let you see the binary in a hexidecimal form. You can do this yourself on the command line:
hexdump hello
We've reproduced some of what it looks like when hello is viewed in hexdump after hello.c has been compiled by gcc:
0000000 457f 464c 0101 0001 0000 0000 0000 0000
0000010 0002 0003 0001 0000 8300 0804 0034 0000
0000020 0820 0000 0000 0000 0034 0020 0008 0028
0000030 001e 001b 0006 0000 0034 0000 8034 0804
0000040 8034 0804 0100 0000 0100 0000 0005 0000
0000050 0004 0000 0003 0000 0134 0000 8134 0804
0000060 8134 0804 0013 0000 0013 0000 0004 0000
0000070 0001 0000 0001 0000 0000 0000 8000 0804
0000080 8000 0804 0518 0000 0518 0000 0005 0000
0000090 1000 0000 0001 0000 0518 0000 9518 0804
00000a0 9518 0804 00fc 0000 0104 0000 0006 0000
00000b0 1000 0000 0002 0000 052c 0000 952c 0804
00000c0 952c 0804 00c8 0000 00c8 0000 0006 0000
00000d0 0004 0000 0004 0000 0148 0000 8148 0804
00000e0 8148 0804 0044 0000 0044 0000 0004 0000
00000f0 0004 0000 e550 6474 04a4 0000 84a4 0804
0000100 84a4 0804 001c 0000 001c 0000 0004 0000
0000110 0004 0000 e551 6474 0000 0000 0000 0000
0000120 0000 0000 0000 0000 0000 0000 0006 0000
0000130 0004 0000 6c2f 6269 6c2f 2d64 696c 756e
0000140 2e78 6f73 322e 0000 0004 0000 0010 0000
0000150 0001 0000 4e47 0055 0000 0000 0002 0000
0000160 0006 0000 0012 0000 0004 0000 0014 0000
0000170 0003 0000 4e47 0055 ac29 394b 26bf 01f1
0000180 e396 f820 3c24 f98c 8c5a 8909 0002 0000
0000190 0004 0000 0001 0000 0005 0000 2000 2000
00001a0 0000 0000 0004 0000 4bad c0e3 0000 0000
00001b0 0000 0000 0000 0000 0000 0000 0001 0000
00001c0 0000 0000 0000 0000 0020 0000 002e 0000
00001d0 0000 0000 0000 0000 0012 0000 0029 0000
00001e0 0000 0000 0000 0000 0012 0000 001a 0000
00001f0 848c 0804 0004 0000 0011 000f 5f00 675f
That's only a small chunk of the program binary. The full binary is much larger -- even though the source code that produces this binary is only two lines long.
As you can see, there's a huge difference between source code, which is intended to be read and written by humans, and binary code, which is intended to be read and written by computer processors.
This difference is a crucial one for programmers who need to modify a computer program. Let's say you wanted to change the program to say "Open source is awesome!!!". With access to the source code, making this change is trivial, even for a novice programmer. Without access to the source code, making this change would be incredibly difficult. And this for two lines of code.
2.3.1. Exercise - Change the source code
Change the source code to print out "Open source is awesome!!!" instead of "Hello World!". Spend no more than half an hour on this exercise.
2.3.2. Optional Exercise - Change the binary code
Change the binary code to print out "FOSS ROXORS!" instead of "Hello World!". Spend no more than half a day on this exercise.
This is actually a tricky exercise, and it could take you a fair bit of time. We included it here because you might be curious and want to go poking around in the binary. Under most flavors of Linux you should be able to find or install a program called hexedit. To get you started, you use TAB to switch from hex to ASCII, / to search, and F2 to save your changes. You can read the rest of the documentation for hexedit by reading the manpage, which you can get to by typing man hexedit on the command line, or pressing F1 while running hexedit.
2.4. Source Code: To Share, or Not To Share?
Obviously, not all software is FOSS.
Most software developers do not share their source code -- especially companies that produce software with the intention of selling it to their customers. Microsoft, for example, does not share the source code for the Windows operating system.
Even freeware -- programs that are downloadable for free from the internet -- may not share their source code with the world. You can get the program for free, but if it breaks, or if you think of a way to make it better, there's no good way to fix it. For example, you can get the Flash Player from Adobe for free, but if you find a bug that crashes Firefox, you're stuck with that bug until Adobe fixes it.
There are definite advantages to keeping source code hidden, especially if your goal is to sell the software itself. It's harder to sell a software program when anyone is free to take the source code and use it for any purpose. If Microsoft were to release the Windows source code under an open source software license, anyone would then be able to take that source code, build "Bob's Own Operating System," maybe make a few changes, and then re-sell that product as a competitor to Microsoft Windows. Obviously, most companies who are selling commercial software don't want that to happen.
2.4.1. The value of sharing
That's not to say that programmers who write open source software never make money. Some of the most successful companies in the world use open source software to power their businesses. Google, Amazon, Wall Street, the US Department of Defense -- some of the world's largest and most innovative companies, government agencies, and industries are writing software using FOSS every day. They don't sell that code; they share it, and by sharing, create more value for their organizations.
The amazing thing about contributing to FOSS software is that you don't have to work for a large company to see the benefits of working in a free and open manner. As a developers, you might write a utilities that solves a particular problem. By sharing it, others might discover the utility of your tool. Others might extend it and help see it grow. At this point, what started as a hack has become something valuable for many. At this point, we begin to see how FOSS development practices can provide demonstrable advantages over proprietary software development practices. Among them:
- Shared development cost
Writing software can be expensive, at least in terms of time. Good software takes time to develop, and time is money. And if writing software is expensive, then maintaining it is even more expensive. In the FOSS model, the cost of the writing and maintaining the software can be spread out over several individuals and/or companies.
- Users can fix their own bugs
This is not a freedom that is obviously useful to everybody. Not every software user is knowledgeable enough to fix a bug when they find it. That's fine; FOSS also means that users can find other people to fix their bugs for them. Not everybody who owns a car is competent to change their own oil, but the freedom to change your oil, or fix a flat tire, or rebuild your own brakes -- or the freedom to be able to go to any mechanic or any mechanically inclined friend and ask them to do it for you -- is a crucial freedom to car owners. FOSS extends that freedom to software.
- (Arguably) better software
Allowing users to fix bugs can often lead to better software. One of the problems with proprietary software is that there's a limit to the number of people you can pay to fix code -- that limit is usually directly proportional to how many software licenses the company can sell. FOSS projects have the potential to build a huge base of participants, far greater than the number of developers that any one company could pay. The Apache HTTP server project is a great example of a FOSS project with many developers, both commercial and independent -- that has created
demonstrably more popular and arguably better software than any of its proprietary counterparts.
- Software that outlives its creator
There are literally thousands and thousands of pieces of software, written for outdated computers, that are no longer useful for any purpose. If we had source code for these pieces of software, we might be able to extend them to new computers, making them continually more useful and more interesting -- but because we don't have the source code for these programs, we have very little use for them anymore. There's a word for this kind of software: abandonware. In FOSS, there's no such thing as abandonware. Sure, people may stop working on a piece of software, but the source is always there, ready to be picked up and carried forward by anyone who has the time and interest to do so. Every dead FOSS project has a chance to be reborn.
- The freedom to fork
Sometimes software projects go wrong. If a project is proprietary, no one has any recourse if they don't like the direction of the project: the owner of the project decides the direction of the project, period. But because FOSS guarantees everybody the right to redistribute and modify the source code, developers can always take a FOSS project and move it in a new direction, without anybody's permission. This process is called
forking. Forks are usually regarded as last resorts, since contentious forks can divide scarce developer resources and confuse users. However, a number of FOSS projects have benefited greatly from forks; the
X.org server and
Inkscape are notable successful forks.
2.4.2. Exercise - List of software
Create a list of all the software that you use on a regular basis. Which software is FOSS? Which applications have FOSS equivalents? What are those equivalents?
2.4.3. Exercise - Compare and contrast similar proprietary and FOSS software
Choose one piece of proprietary software that you use regularly and find its FOSS equivalent if it has one. (If not, pick another program.) Write a blog post comparing the two. Don't just look at the code; look at the entire experience. How are the user interfaces different or similar? What about the user's experience overall? Is the quality of the documentation comparable? Is one buggier than the other? (This may take some spelunking in forums, looking for bug reports, etc?)
What, in your estimation, would it take for a new user to switch from the proprietary, closed-source software to the FOSS equivalent?
2.4.4. Exercise - Install a new FOSS Tool and Blog About It
Go find a new piece of open source software that interests you. Install it, and blog about any problems that you have. Bear in mind that your notes may come in handy during later exercises.
2.5. Climbing Contributor Mountain
Participation in FOSS projects is similar, in many ways, to an apprenticeship. It takes some effort, and some help, to work your way to the top. Let's watch the path a typical newbie takes up Contributor Mountain.
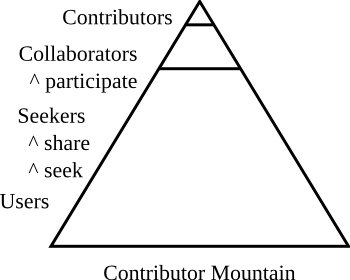
Everyone begins at the base of the mountain as a user of software. Let's take our hypothetical friend Alice as an example.
Alice is a budding artist, and she likes to share her work with friends online. She's a big fan of anime. One of her friends suggests that she might be interested in a program called Inkscape, a cool illustration program.
So Alice goes and downloads Inkscape and installs it on her computer. She plays with it. She doesn't understand it very well, but it seems kinda cool.
Then her friend points her to a couple of Inkscape anime tutorials online, and Alice's opinion of Inkscape changes from "kinda cool" to "incredibly cool." Within a few short months and a lot of practice, Alice becomes a devoted Inkscape user. As it happens, developers sometimes forget that users are the reason that software exists. Alice, in becoming a devoted and expert user of Inkscape has taken the first, critical steps to being a valuable contributor to the Inkscape project.
Note: Alice may not yet know, or care, that Inkscape is FOSS software; in fact, she probably doesn't even know what FOSS is. It's irrelevant to her. She loves the fact that Inkscape is freely available, which is one of the great features of FOSS software -- but beyond that, the concept of FOSS just isn't meaningful to her. Yet.
The Internet has changed the way we ask questions. Billions of people can now go to a web page, ask almost any imaginable question, and get some kind of response -- maybe right, maybe dramatically wrong, but some kind of response. It is this experience that is, in no small part, why the word "google" is now a verb. Alice, without realizing it, will quickly move from a "User" of Inkscape to a "Seeker" of information.
Our friend Alice has a problem. She has an Inkscape file with lots of cool images that some of her friends have made, and she wants to use them as part of a new illustration she's working on. But when she opens that file, and then tries to cut and paste into a new document, Inkscape crashes. Well, it crashes sometimes. And this unpredictability is becoming annoying -- so Alice goes to her favorite online anime discussion forum to ask her friends if they're seeing this problem.
One friend recommends that she go ask on the Inkscape developers mailing list. Another friend recommends that she file a bug. A third friend asks for more details: when does it happen? Does it happen randomly, or can she make it happen by doing a particular thing over and over? Then another person pops up and says that yes, he's had that problem too, but he works around it by opening his documents in a certain order. After some back-and-forth with this new friend, trying to figure out exactly what he means, Alice figures out the workaround: no more crashes! Alice thanks everyone for their help and gets back to her project.
Alice has become a seeker. By looking for answers, Alice has discovered a broad community of people who are willing to help her figure out how to do things a better way.
This bug still bugs Alice.
When she forgets about the workaround, the bug still bites her. Lately, some of the other people who hang out on her anime forums have been complaining about this bug, too, and she always points them to the forum thread where she learned about the workaround. But still she wonders: when is it going to get fixed?
And then she wonders: is there anything I can do about it?
This crucial step is what makes FOSS unique: it's the step at which Alice decides to become a collaborator.
Why? Good question. Contributors to FOSS have many different reasons -- but a frequently heard rationale is the desire to "scratch an itch." Alice loves Inkscape, but she hates this bug.
She thinks back to the forum discussion in which one of her friends advised her to "file a bug." She's not even quite sure what that means, exactly, but now that she's decided she wants to help, she starts looking around. After a bit of googling and sorting through some stuff that doesn't make any sense to her at all, she finds a page on the Inkscape wiki that tells her what to do.
One sentence stands out: "Check the bug tracker first; your bug may be already there." So she goes to the Inkscape bug tracker and searches for "crash", and finds a ton of bugs -- seems like software crashes a lot! She tries a few more search terms (like "copy" and "paste"), and the number of bugs she has to look through starts to drop. Alice's search through the bugs uncovers a great deal that she doesn't quite understand... until she finds a bug that looks almost exactly like her bug! She sees some comments on the bug that say things like "I've confirmed this on my Ubuntu system" and so on -- so she creates an account for the Inkscape bug tracker, and adds her comment, confirming that she, too, has experienced this bug on her Mac Powerbook. Two months later, she receives an email that the latest version will contain a fix.
Even a seemingly small collaboration can be useful.
The line between collaborator and contributor can be a blurry line, and there are many ways to define contribution, but here's one good way of thinking about it: a contributor is a person that a FOSS community actively relies upon for help.
Of course, some contributors focus on writing code -- but for the most successful projects, this is a comparatively small percentage of contributors. Some contributors maintain a wiki and help keep it up to date. Some contributors test every new beta version the day it's released. Some write documentation about the project. Some go through bug reports, to make sure that bugs are useful for developers. Some blog about the new features to help spread the word.
All of these contributors are making their projects better -- and every FOSS project needs more of these kinds of contributors.
It is our hope that this book will help guide you, the reader, to the top of the Contributor Mountain.
2.6. Building Your FOSS Portfolio
Perhaps the greatest benefit of contributing to FOSS projects: you have the opportunity prove, to yourself and to others, that you can usefully contribute to real software projects. You will meet and interact with other developers, some of whom work on FOSS projects for a living. If you can help them solve their problems, they are inclined to help you solve yours -- with advice, contacts, recommendation letters, and maybe even job offers.
One of the big differences between working in FOSS and working on proprietary software is that your work is visible to anyone who cares to look. Every mailing list post you write, every blog entry you post, every bug you file, every wiki page you edit, and every line of code you write, are available for anyone's inspection.
This a huge potential advantage, if you know how to use it. In the coming chapters, as you begin to engage with your chosen FOSS project, we point out portfolio building opportunities.
Really, though, the portfolio should be a side effect. If you choose a project that matters to you, and if you work hard to help that project achieve its goals, then your portfolio builds itself.
2.6.1. Exercise - Learn about a project's leaders
Revisit the project you blogged about in
Section 2.2.6, “Exercise - Finding a Cool Project”, and spend some time figuring out who some of the project leaders are. Read through the project wiki, mailing lists, and so on. What can you find out about the project leaders? What information do they make available about themselves? Given what you've read, what do you think about their work?
2.6.2. Exercise - Write your own FOSS bio
Find an online wiki provider --
Wikispaces, for example -- and create a wiki page that will become your online FOSS portfolio. Write a little bit about yourself. Link to content: your resume, your blog, your Twitter account, or anything that might be relevant to potential employers. You will use this portfolio extensively over the course of this book.
2.7. Supplemental Materials
The Cathedral and The Bazaar is a great story about the FOSS principles in action. Written originally in 1998 by Eric S. Raymond, it's considered a must-read by many FOSS practitioners.
Chapter 3. The Lay of the Land
Free and Open Source Software (FOSS) is as much about community as it is about writing software. Consider the two words that make up the phrase open source: obviously, having source code is not a unique quality, since all software has source code, somewhere. The distinguishing feature of open source software is its openness, but being open is moot unless there is a community using the software. The more people using, collaborating, and contributing to the software, the greater the value of its openness.
Each FOSS project builds its own unique community with its own qualities. Some communities are small, others large; some are highly structured, some are much more casual; some readily welcome new contributors, others have high barriers to entry; and some communities are global, while others are very local. One of the first steps in getting involved with an open source community is to scout out the lay of the land and discover the characteristics of the community. To do so, you need to understand the qualities you're looking for, and you need to understand how to communicate with the community.
It's important -- and a little daunting -- to realize that the concept of open applies not only to the source code, but to all of the activity that takes place within a community. Engaging with an open source community means working in the open, succeeding in the open, and failing in the open.
At the end of this chapter, you should:
Understand the key qualities of a FOSS community;
Understand common FOSS communication tools;
Be able to determine the qualities of a specific FOSS community;
Start to engage with one or more FOSS communities using its communication tools and culture.
3.1. The Challenges of Global Community
Most FOSS projects are (or aspire to become) distributed, global communities. This introduces a number of challenges:
Language. Any global community will of necessity include participants with different native languages. Large projects usually evolve collaborative subgroups that work on documentation and
localization for specific languages, but contributors to code and
base documentation need a common language in which they can communicate. In many cases, the common language is English -- in part because it is one of the most widely spoken languages today. However, the fact that the reserved keywords and base documentation for many programming languages are in English may also be a critical factor. In Eric S. Raymond's
How to Become a Hacker, Linus Torvalds, the original creator of the Linux kernel, is quoted as saying that it never occurred to him to comment the Linux kernel code in any language other than English, despite the fact that English is his third language.
Time and distance. The fact that our globe spins introduces some interesting challenges: collaborators in India and the USA, for example, will never be able to collaborate in real time during normal business hours -- in fact, they'll hardly be able to collaborate during normal waking hours. Most communities meet face-to-face only once or twice a year, if at all, and the face-to-face meetings usually involve only a small subset of the whole community. These challenges have forced the development of really good asynchronous online communication tools. However, having people in different timezones also has some advantages, making it easier to staff IRCchannels, follow rapidly-developing security issues, and manage infrastructure24x7.
Ego. Standing out in an ocean of nicknames and e-mail addresses, trusting people you have never met, and accepting criticism from strangers is very difficult. Control freaks, glory-grabbers, bullies, and fearmongers exist in FOSS communities and are poisonous to community-building. Creating a fork of a software project is a significant undertaking that is not usually done except as a last resort, because it divides community attention and requires duplication of resources; however, the simple fact that a fork is possible and the community is essential often provides an effective check on runaway egos.
3.2. The Synthetic Third Culture
Ruth Hill Useem developed the term
Third Culture Kids (TCKs) forty years ago to describe the children of military, diplomatic, missionary, and other families who exist in a twilight world between their passport countries and the countries in which they live. Often, these children are neither at home in their birth culture nor in the culture in which they live day-to-day, a fact that often becomes evident only upon returning to their native country. TCKs usually feel more at home with other TCKs than with other people.
In a somewhat similar way, FOSS communities often create their own culture, which is not the native culture of any of the participants. When Chinese developers work with Brazilian colleagues day after day, their communication does not usually reflect much of either Chinese nor Brazilian culture. When joined by colleagues from (say) Morocco, Russia, Canada, and Australia, native culture is made even less significant. Over time, the communities build up shared experiences, humor, social norms, and conventions that define that community, building up a synthetic third culture.
This is not unique -- collaborative groups have always developed their own sense of identity. The difference with most FOSS communities is that the collaboration is remote, so the participants remain in their native cultural context while participating in the synthetic third culture of the FOSS community, and the interaction is high-volume and sustained over a long period of time (decades, in some cases). Obviously, the diversity, intensity, and health of the community play a significant role in the depth and uniqueness of the third culture.
3.3. Qualities of a Community
Each FOSS community has a rich set of defining qualities. Understanding these qualities is essential to evalutating and participating in the community:
Qualities of a Community
- Focus
What does the community want to achieve? The stated goals may be broader than the actual interest and focus of the community. For example, a group may state that they're developing a Geographic Information System (GIS), which is a broad goal -- but the actual software may be focused on just one particular use of GIS.
- Maturity and History
Is the project new or old? Young communities may not have developed effective procedures and rhythms, or may not yet have attracted contributors other than developers (such as documentation writers, artists, testers, and marketers). On the other hand, older communities may have plateaued with a stable, complete product (good) or stagnated (bad). Some of the oldest FOSS communities, such as the X Windows community, have gone through multiple periods of rapid development, stable releases, stagnation, and rejuvenation.
- Type of Openness
The term open source is broadly applied, but there are many different types and degrees of openness. Some projects are open in a lob-the-software-over-the-wall sense: the code has been released under an open source license, but no community has formed around it; periodically, a new source tarball comes flying over the wall to play with, and it's not obvious how to contribute improvements back to the main source of the code -- or if it's even possible at all. Some projects have an active community but a strict management hierarchy anchored by a dictator-for-life or impenetrable core committee, while others have an openness that extends to their management structure. There are also projects where the core source code is tightly controlled, but are extremely open in peripheral areas such translations, documentation, and community support.
- Commercial ties
Is there a company (or companies) sponsoring the project? Some sponsors provide only resources (funding, equipment, infrastructure), while others provide technology, legal protection, people, or some combination. It's important to understand how much influence the sponsors have in the overall direction of the project, and whether the community can continue if the sponsor pulls out (or fails).
- Subgroups
Does the community operate as a whole, or does it operate as a collection of subgroups? Some large communities have formally-defined subgroups, while others have communities that form, expand, contract, and dissolve in an organic way as needed. Sub-groups may also be defined along technological, use-case, geographic, or functional lines.
- Skills
Each community requires and focuses on different sets of skills. In some cases, a community could benefit from having new contributors with skill sets that are not currently represented or even recognized as being needed.
- Mentoring and Training
Some communities grow in a haphazard way, while others have clearly-defined, simple on-ramps with purposeful training and mentorship programs.
Communication in an open-source community takes many forms, but all of these break down into two broad categories: synchronous (live/concurrent) and asynchronous (non-simultaneous). Synchronous communications might include instant messaging and various forms of audio chat; asynchronous communications include everything from email to wiki pages. Due to the geographically-dispersed nature of most communities, most communication makes heavy use of technology: it's no accident that open source in its current form has grown hand-in-hand with the Internet.
The online anchor-point for most communities is a web site. However, the nature of traditional HTML pages is that they are a static, one-to-many form of communication created by a small number of people with write access to a server. This leads to pages that can become quickly outdated and which do not truly reflect the collaborative nature of the community.
For this reason, many open source projects have an anchor site with a few static pages, but the bulk of their web content comes from wiki (user-editable), forum (user-posted), and mailing list archive pages.
The concept of a wiki is widely understood due to the popularity of Wikipedia: it's a web site where the pages are user-editable. A wiki provides an easy-to-use, asynchronous way of putting semi-permanent content on the web, so they are ideal for documentation, timelines, status reports, meeting minutes, and conversation logs. From the perspective of a reader, accessing wiki content is the same as accessing static HTML content, and search enginesindex wiki content very well. For the writer, a wiki provides version control, a database backend, simplified markup, and a fast edit-and-post cycle.
Most open source projects use one of the common wiki packages such as MediaWiki (which also powers Wikipedia), TikiWiki, MindTouch, or Trac; this has the benefit of reducing the number of different types of markup that must be memorized.
Wikis are related to content management systems (CMS), such as Drupal or Wordpress. When a project uses a CMS for a website, the goal is the same -- enable the community to edit the project content.
3.5. Exercise - Project Wikis
Wikis are meant to be community spaces where everyone can join in. They grown and are made better through community participation. For this exercise, we're going to encourage you to check out the wikis of three established open source projects. These might be projects you looked at in the previous chapter:
What wiki software are they using?
Search in the wiki for the history and current structure of the project. Is it in the wiki, or is it somewhere else in their project?
When the last change was made, who made it, and how often are changes submitted. Would you describe this wiki as "thriving" or "languishing"?
Authoring and maintaining pages in a wiki (the latter sometimes being referred to as gardening) is a critical part of any FOSS project. If you're particularly interested in a project, register an account on the wiki and create a User Profile page. You'll want to link this back to your portfolio that you created in the previous chapter.
While a wiki provides a semi-permanent place for content, blogs provide the opposite: a flow of transient, in-the-moment news and commentary.
Because many open source participants write blogs, it has become difficult to keep up with them on a one-by-one basis. The volume of blog postings created within a community can be overwhelming. To help deal with this, RSS or Atom feeds enable the receipt of content in a machine-readable format so that it can be used in a variety of different ways (for example, in Firefox Live Bookmarks, through a service such as Google Reader, or in a program such as Liferea or FeedReader). Many open-source community maintain a Planet site which aggregates the feeds from community members into a single page (and the Planet, in turn, provides an aggregated feed). Here are some examples:
In most cases, individual blog postings can be tagged or categorized, and separate feeds can be generated for each tag or category. This permits posts to be sent to one or more different planets at the author's discretion.
As you get into FOSS, you will want to share your news and opinions with others via a blog. You need to represent your thoughts professionally; here are some guidelines:
Write professionally. Blog postings are less formal than other types of writing, but they are still a reflection of your communications skills.
Remember that the internet has a long memory. The Planet page is generated periodically, and even if you delete or change your posting, it may be indexed, cached, or reposted until the planet is re-generated. Avoid saying something that might come back to haunt you later -- and remember that future employers may read your old postings (as well as future in-laws, office mates, and so forth).
Do not use profane, obscene, or rude content, or content that belittles other people.
Do not link to profane, obscene, rude, or illegal material or to sites that knowingly violate intellectual property rights (warez).
Ensure that each posting makes sense when taken out of the context of your blog and viewed on its own. If you are referring to one of your previous posts, link to it rather than refer to it as being "below" or "above".
Link extensively. If you're referring to a blog post, article, video, event, command, software package, person, project -- link to all of them so that your readers can find out more information.
Ensure that each posting conforms to your community or institution's policies.
Keep the postings relevant to your open source work. Use tagging/categories to keep deeply off-topic posts off your planet feeds.
3.7. Exercise - Linking your Blog to Planets
In the introduction, you created a blog for yourself. Add that blog to your class planet, if there is one. Monitor the planets operated by the communities that run the wikis you investigated, and create a blog posting of your own with your observations of the community planets.
IRC stands for Internet Relay Chat and is one of the primary means of synchronous communication between people working on a FOSS project. It's an older text-based chat system where clients connect to the servers of one or more networks, and the servers relay messages between themselves within each network (hence the name). Communication is done in channels which individual users join, and users are identified by nicks (nicknames). In addition to human users, various services and bots (robots -- programs) are present in many channels.
To use IRC, you'll need an IRC client; Wikipedia maintains an
excellent list of options. We recommend installing a few on your system and trying them out to see which one you prefer. You'll need to select a nickname (
nick or
handle) -- choose wisely, because you'll want to keep your nick for the long run. It's strongly recommended that you
register your nick so that other people cannot masquerade as you.
There are a handful of IRC networks used in open source, including ones operated by large projects (such as irc.mozilla.org) and ones which are operated by organizations and shared by many different communities (such as irc.freenode.net and irc.oftc.net). These are open channels and may be logged by one or more entities. Consider anything you say in IRC to be as public as if you said it on a busy street corner, with a megaphone, and seven people videotaping everything.
Most IRC clients let you perform operations using menus/hotkeys or by typing commands. Commands start with a slash ("/") to distinguish them from text that you are typing into the chat session. Since the commands are the same in all IRC clients, it's worthwhile becoming familiar with them -- here are some of the basics:
/connect server - connect to the named IRC server.
/list - lists available channels. Channel names start with "#" (official channels) or "##" (unofficial channels).
/join channel - join the listed channel on the server to which you are connected.
/me action - reports your nick as performing an action.
/leave reason - leave the current channel, citing the reason given (optional).
/quit reason - leave the server, citing the reason given (optional).
Any text you type that does not begin with a slash is taken to be text, and is entered into the conversation.
It is normal to join a channel and say nothing. In fact, it is expected: don't join a channel and say "hi" or leave and say "bye" -- you may be interrupting a conversation already underway. Feel free to join as many channels as you like, once you're comfortable with IRC.
It is fine to join a channel and sit there idle for a long time, lurking. You might never say anything; this is a good way for you to learn about who is in the channel, what they are talking about, etc. Listening is often more important than talking, because you learn more.
If you have a question you should just ask it rather than saying, "Can I ask a question about ..." or "Does anyone know about ...". You don't need to direct general questions to a specific person. Rather, you should ask in the channel in general, and someone usually answers you:
<don> How do I ask a question?
<funny_guy> don: you just did!
If there are several conversations taking place at the same time, it's customary to put the nick of the user you are directing your comment to at the start of the line (as shown in the second line above); most IRC clients send a special alert to a user whose nick is "spoken" in a channel. Most IRC clients also auto-complete the nick when you press the Tab key, so you could type funTab to fill in the nick "funny_guy".
Channels generally have a purpose, and people are often joined to many different channels at once. You'll see many of the same people in different channels. However, what might be appropriate in one channel often isn't in another. When you enter a channel, take a look at its Topic (displayed at the top, or with the /topic command) for clues.
Generally you should avoid small-talk unless you are sure that it is appropriate. Even if you see others in the channel doing it, don't take that to mean that you should (i.e., channel veterans can get away with things newcomers can't!). At the same time, be ready for a playful and (at times) very sarcastic environment.
Also be aware that you never know who you are talking to based on their nicks (you learn who people are later, as you get to know people's nicks), and avoid making assumptions about people in the channel.
3.9. Exercise - Learning IRC
Install one or more IRC clients. Find out which network(s) and channel(s) are used by the three open source communities that operate the wikis you investigated. Choose a nick and connect to those networks and channels. Leave your IRC client open for at least 24 hours, and observe the patterns of conversation and key participants. Have a discussion in at least one of the channels, and blog about your experience, including an excerpt from your conversation.
3.10. Mailing Lists and Newsgroups
Almost all open source communities use an electronic mail list for discussions. These lists are sometimes managed through online services such as Google Groups, but are often managed through private installations of
list management software such as
MailMan, which provide
subscriber management,
bounce control, and web-accessible archiving.
Surprisingly, there is a significant variation from community to community in terms of list ettiquite and even the amount of participation on lists.
Some communities use newsgroups or forums in place of mailing lists, but these are usually gatewayed to an e-mail list -- for example, Mozilla uses newsgroups extensively, but many of the Mozilla newsgroup participants actually access the newsgroups as mail.
An open-source participant subscribed to several lists in multiple communities can easily receive thousands of messages a day. For this reason, many people choose to use a separate mailbox (such as a Gmail account) or filtering rules to keep their mail under control.
3.11. Exercise - Joining the List
Subscribe to at least one mailing list from each of the three open source communities you are observing, and read through the last few months of message archives for each list. Blog your observations of their communication.
3.12. Bug Trackers and Repositories
It may not be immediately obvious, but bug trackers and code repositories are also important communication tools in most open source communities; for example, there are often significant discussions that take place in bug trackers. See the chapters (XREF).
3.13. Drawing Conclusions
We learn to read before we learn to write; in the same way, the best way to start working with an open source community is to observe that community in action. As you have completed the exercises in this chapter, you should have started to form an impression about the communities that you have been observing.
3.13.1. Exercise - Share Your Thoughts
Write a blog post summarizing your thoughts about the communities you've been observing. Specifically note your conclusions about the qualities of the community identified earlier.
Chapter 4. Getting the Code
This is a conversation that you never want to hear.
"Oh no! The frobnitz is broken!"
"But it was working last week."
"I don't know what happened - was it the changes I made to the gorblewhonker?"
"Wait, I was putting that function in the gorblewhonker. I told you after class on Thursday, remember?"
"Shoot. Do you have last week's version with the working frobnitz? What's the difference?"
"Maybe. I don't know. Does this mean we have to redo all the improvements we've made to the blooglebox since then?"
"Argh."
There are tools that allow you to avoid these kinds of conversations.
Have you ever created a folder that looked something like this?
mycode-1.py
mycode-2.py
mycode-2-with-rachel's-changes.py
mycode-working.py
mycode-LATEST.py
If so, you have used version control. According to Wikipedia
version control "is the management of changes to documents, programs, and other information stored as computer files."
A system that manages version control for software development is called a source code management system, or an SCM for short. In this chapter, you will learn the basic use of source control management.
The FOSS world has developed many excellent SCMs to choose from. Each have their strengths and weaknesses, and choosing which SCM to use for a new project is always a popular subject for debate.
You may want to start your own project someday, and you will have to choose an SCM. Right now, though, you will be working with existing projects, which means the SCM has been chosen for you. The following five SCMs are very popular, and you're likely to see them often:
Eventually you may use all of these SCMs, or a different SCM entirely. Each SCM has some unique characteristics -- but most basic version control concepts are common to all SCMs.
Since these concepts are new, the focus will be on learning one SCM: Subversion.
4.2.1. Exercise - Install Subversion on Your System
Install Subversion on your system. Subversion clients exists for all platforms; search the Internet for instructions. Ask your classmates, or ask on IRC, if you need help.
4.3. Getting Help With Subversion
Before reading on, here is the most important command you ever need when using Subversion: svn help. The Subversion command-line client is self-documenting -- at any time, a quick svn help SUBCOMMAND describes the syntax, options, and behavior of the subcommand.
svn help update
update (up): Bring changes from the repository into the working copy.
usage: update [PATH...]

  If no revision is given, bring working copy up-to-date with HEAD rev.
  Else synchronize working copy to revision given by -r.

  For each updated item a line will start with a character reporting the
  action taken.  These characters have the following meaning:
...
4.4. Getting Started: checkout
Most of the time, you start using a Subversion repository by doing a checkout of your project. Checking out a repository creates a working copy of it on your local machine. This copy contains the HEAD (latest revision) of the Subversion repository that you specify on the command line:
$ svn checkout http://svn.collab.net/repos/svn/trunk
A    trunk/Makefile.in
A    trunk/ac-helpers
A    trunk/ac-helpers/install.sh
A    trunk/ac-helpers/install-sh
A    trunk/build.conf
…
Checked out revision 8810.
Although the above example checks out the trunk directory, you can just as easily check out any deep subdirectory of a repository by specifying the subdirectory in the checkout URL:
$ svn checkout \
      http://svn.collab.net/repos/svn/trunk/subversion/tests/cmdline/
A    cmdline/revert_tests.py
A    cmdline/diff_tests.py
A    cmdline/autoprop_tests.py
A    cmdline/xmltests
A    cmdline/xmltests/svn-test.sh
…
Checked out revision 8810.
Since Subversion uses a copy-modify-merge model, you can start right in making changes to the files and directories in your working copy. Your working copy is just like any other collection of files and directories on your system. You can edit and change them, move them around, you can even delete the entire working copy and forget about it.
While you can certainly check out a working copy with the URL of the repository as the only argument, you can also specify a directory after your repository URL. This places your working copy in the new directory that you name. For example:
$ svn checkout http://svn.collab.net/repos/svn/trunk subv
A    subv/Makefile.in
A    subv/ac-helpers
A    subv/ac-helpers/install.sh
A    subv/ac-helpers/install-sh
A    subv/build.conf
…
Checked out revision 8810.
That places your working copy in a directory named subv instead of a directory named trunk as we did previously. The directory subv is created if it doesn't already exist.
4.4.1. Exercise - Initial Checkout of the Sample Codebase
4.5. The Basic Subversion Work Cycle
Subversion has numerous features, options, and bells and whistles, but on a day-to-day basis, odds are that you only use a few of them. In this section we run through the most common things you might find yourself doing with Subversion in the course of a day's work.
The typical work cycle looks like this:
Make changes
svn add
svn delete
svn copy
svn move
Possibly undo some changes
Resolve Conflicts (Merge Others' Changes)
4.5.1. Update Your Working Copy
When working on a project with a team, you want to update your working copy to receive any changes made since your last update by other developers on the project. Use svn update to bring your working copy into sync with the latest revision in the repository.
$ svn update
U  foo.c
U  bar.c
Updated to revision 2.
In this case, someone else checked in modifications to both foo.c and bar.c since the last time you updated, and Subversion has updated your working copy to include those changes.
When the server sends changes to your working copy via svn update, a letter code is displayed next to each item to let you know what actions Subversion performed to bring your working copy up-to-date. We cover the meaning of these letters shortly.
4.5.1.1. Exercise - Get Updates From the Sample Repository
Update your working copy of the TOS repo. Has anything changed?
4.6. Make Changes to Your Working Copy
Now you can get to work and make changes in your working copy. It's usually most convenient to decide on a discrete change (or set of changes) to make, such as writing a new feature, fixing a bug, etc. The Subversion commands that you use here are svn add, svn delete, svn copy, svn move, and svn mkdir. However, if you are merely editing files that are already in Subversion, you may not need to use any of these commands until you commit.
There are two kinds of changes you can make to your working copy: file changes and tree changes. You don't need to tell Subversion that you intend to change a file; just make your changes using your text editor, word processor, graphics program, or whatever tool you would normally use. Subversion automatically detects which files have been changed, and in addition handles binary files just as easily as it handles text files -- and just as efficiently too. For tree changes, you can ask Subversion to mark files and directories for scheduled removal, addition, copying, or moving. These changes may take place immediately in your working copy, but no additions or removals happen in the repository until you commit them.
Here is an overview of the five Subversion subcommands that you'll use most often to make tree changes.
svn add foo
Schedule file, directory, or symbolic link foo to be added to the repository. When you next commit, foo becomes a child of its parent directory. Note that if foo is a directory, everything underneath foo is scheduled for addition. If you only want to add foo itself, pass the --non-recursive (-N) option.
svn delete foo
Schedule file, directory, or symbolic link foo to be deleted from the repository. If foo is a file or link, it is immediately deleted from your working copy. If foo is a directory, it is not deleted, but Subversion schedules it for deletion. When you commit your changes, foo is entirely removed from your working copy and the repository.
svn copy foo bar
Create a new item bar as a duplicate of foo and automatically schedule bar for addition. When bar is added to the repository on the next commit, its copy history is recorded (as having originally come from foo). The svn copy command does not create intermediate directories.
svn move foo bar
This command is exactly the same as running svn copy foo bar; svn delete foo. That is, bar is scheduled for addition as a copy of foo, and foo is scheduled for removal. The svn move command does not create intermediate directories.
svn mkdir blort
This command is exactly the same as running mkdir blort; svn add blort. That is, a new directory named blort is created and scheduled for addition.
4.6.1. Exercise - Create a Biography File and Add It to the Local Repository
Using other biography files as examples, create a biography file of yourself in the bio/ directory and add it to your local repository. Also add a link to that file in the index.html file in the root directory.
4.7. Examine Your Changes
Subversion has been optimized to help you with this task, and is able to do many things without communicating with the repository. In particular, your working copy contains a hidden cached pristine copy of each version controlled file within the .svn area. Because of this, Subversion can quickly show you how your working files have changed, or even allow you to undo your changes without contacting the repository.
svn status
To get an overview of your changes, use the svn status command. You may use svn status more than any other Subversion command.
If you run svn status at the top of your working copy with no arguments, it detects all file and tree changes you've made. Below are a few examples of the most common status codes that svn status can return. (Note that the text following # is not actually printed by svn status.)
A       stuff/loot/bloo.h   # file is scheduled for addition
C       stuff/loot/lump.c   # file has textual conflicts from an update
D       stuff/fish.c        # file is scheduled for deletion
M       bar.c               # the content in bar.c has local modifications
In this output format svn status prints six columns of characters, followed by several whitespace characters, followed by a file or directory name. The first column tells the status of a file or directory and/or its contents. The codes we listed are:
A item
The file, directory, or symbolic link item has been scheduled for addition into the repository.
C item
The file item is in a state of conflict. That is, changes received from the server during an update overlap with local changes that you have in your working copy. You must resolve this conflict before committing your changes to the repository.
D item
The file, directory, or symbolic link item has been scheduled for deletion from the repository.
M item
The contents of the file item have been modified.
If you pass a specific path to svn status, you get information about that item alone:
$ svn status stuff/fish.c
D      stuff/fish.c
The svn status command also has a --verbose (-v) option, which shows you the status of every item in your working copy, even if it has not been changed:
$ svn status -v
M               44        23    sally     README
                44        30    sally     INSTALL
M               44        20    harry     bar.c
                44        18    ira       stuff
                44        35    harry     stuff/trout.c
D               44        19    ira       stuff/fish.c
                44        21    sally     stuff/things
A                0         ?     ?        stuff/things/bloo.h
                44        36    harry     stuff/things/gloo.c
This is the long form output of svn status. The letters in the first column mean the same as before, but the second column shows the working-revision of the item. The third and fourth columns show the revision in which the item last changed, and who changed it.
None of the prior invocations to svn status contact the repository — instead, they compare the metadata in the .svn directory with the working copy. Finally, there is the --show-updates (-u) option, which contacts the repository and adds information about things that are out-of-date:
$ svn status -u -v
M      *        44        23    sally     README
M               44        20    harry     bar.c
       *        44        35    harry     stuff/trout.c
D               44        19    ira       stuff/fish.c
A                0         ?     ?        stuff/things/bloo.h
Status against revision:   46
Notice the two asterisks: if you were to run svn update at this point, you would receive changes to README and trout.c. This tells you some very useful information -- you need to update and get the server changes on README before you commit, or the repository will reject your commit for being out-of-date. (More on this subject later.)
The svn status command can display much more information about the files and directories in your working copy than we've shown here — for an exhaustive description of svn status and its output, see svn status.
svn diff
Another way to examine your changes is with the svn diff command. You can find out exactly how you've modified things by running svn diff with no arguments, which prints out file changes in unified diff format:
$ svn diff
Index: bar.c
===================================================================
--- bar.c	(revision 3)
+++ bar.c	(working copy)
@@ -1,7 +1,12 @@
+#include <sys/types.h>
+#include <sys/stat.h>
+#include <unistd.h>
+
+#include <.stdio.h>

 int main(void) {
-  printf("Sixty-four slices of American Cheese...\n");
+  printf("Sixty-five slices of American Cheese...\n");
 return 0;
 }

Index: README
===================================================================
--- README	(revision 3)
+++ README	(working copy)
@@ -193,3 +193,4 @@
+Note to self:  pick up laundry.

Index: stuff/fish.c
===================================================================
--- stuff/fish.c	(revision 1)
+++ stuff/fish.c	(working copy)
-Welcome to the file known as 'fish'.
-Information on fish will be here soon.

Index: stuff/things/bloo.h
===================================================================
--- stuff/things/bloo.h	(revision 8)
+++ stuff/things/bloo.h	(working copy)
+Here is a new file to describe
+things about bloo.
The svn diff command produces this output by comparing your working files against the cached pristine copies within the .svn area. Files scheduled for addition are displayed as all added text, and files scheduled for deletion are displayed as all deleted text.
Output is displayed in unified diff format. That is, removed lines are prefaced with - and added lines are prefaced with +. The svn diff command also prints filename and offset information useful to the patch program, so you can generate patches by redirecting the diff output to a file:
svn diff > patchfile
You could, for example, email the patch file to another developer for review or testing prior to commit.
Subversion uses its internal diff engine, which produces unified diff format, by default. If you want diff output in a different format, specify an external diff program using --diff-cmd and pass any flags you'd like to it using the --extensions (-x) option. For example, to see local differences in file foo.c in context output format while ignoring case differences, you might run svn diff --diff-cmd /usr/bin/diff --extensions '-i' foo.c.
4.8. Undoing Working Changes
Suppose while viewing the output of svn diff you determine that all the changes you made to a particular file are mistakes. Maybe you shouldn't have changed the file at all, or perhaps it would be easier to make different changes starting from scratch.
This is a perfect opportunity to use svn revert:
$ svn revert README
Reverted 'README'
Subversion reverts the file to its pre-modified state by overwriting it with the cached pristine copy from the .svn area. But also note that svn revert can undo any scheduled operations -- for example, you might decide that you don't want to add a new file after all:
$ svn status foo
?      foo

$ svn add foo
A         foo

$ svn revert foo
Reverted 'foo'

$ svn status foo
?      foo
Note: svn revert ITEM has exactly the same effect as deleting ITEM from your working copy and then running svn update -r BASE ITEM. However, if you're reverting a file, svn revert has one very noticeable difference -- it doesn't have to communicate with the repository to restore your file. Which is very useful if you're working disconnected from the coffeeshop.
Or perhaps you mistakenly removed a file from version control:
$ svn status README
       README

$ svn delete README
D         README

$ svn revert README
Reverted 'README'

$ svn status README
       README
4.9. Resolve Conflicts (Merging Changes of Others)
We've already seen how svn status -u can predict conflicts. Suppose you run svn update and some interesting things occur:
$ svn update
U  INSTALL
G  README
C  bar.c
Updated to revision 46.
The U and G codes are no cause for concern; those files cleanly absorbed changes from the repository. The files marked with U contained no local changes but were Updated with changes from the repository. The G stands for merGed, which means that the file had local changes to begin with, but the changes coming from the repository didn't overlap with the local changes.
But the C stands for conflict. This means that the changes from the server overlapped with your own, and now you have to manually choose between them.
Whenever a conflict occurs, three things typically occur to assist you in noticing and resolving that conflict:
Subversion prints a C during the update, and remembers that the file is in a state of conflict.
If Subversion considers the file to be mergeable, it places conflict markers — special strings of text which delimit the sides of the conflict—into the file to visibly demonstrate the overlapping areas. (Subversion uses the svn:mime-type property to decide if a file is capable of contextual, line-based merging.)
For every conflicted file, Subversion places three extra unversioned files in your working copy:
filename.mine -- this is your file as it existed in your working copy before you updated your working copy — that is, without conflict markers. This file has only your latest changes in it. (If Subversion considers the file to be unmergeable, then the .mine file isn't created, since it would be identical to the working file.)
filename.rOLDREV -- this is the file that was the BASE revision before you updated your working copy. That is, the file that you checked out before you made your latest edits. OLDREV is the revision number of the file in your .svn directory.
filename.rNEWREV -- this is the file that your Subversion client just received from the server when you updated your working copy. This file corresponds to the HEAD revision of the repository. NEWREV is the revision number of the repository HEAD.
For example, Sally makes changes to the file sandwich.txt in the repository. Harry has just changed the file in his working copy and checked it in. Sally updates her working copy before checking in and she gets a conflict:
$ svn update
C  sandwich.txt
Updated to revision 2.
$ ls -1
sandwich.txt
sandwich.txt.mine
sandwich.txt.r1
sandwich.txt.r2
At this point, Subversion does not allow Sally to commit the file sandwich.txt until the three temporary files are removed:
$ svn commit -m "Add a few more things"
svn: Commit failed (details follow):
svn: Aborting commit: '/home/sally/svn-work/sandwich.txt' remains in conflict
To resolve a conflict do one of three things:
Merge the conflicted text by hand (by examining and editing the conflict markers within the file).
Copy one of the temporary files on top of the working file.
Run svn revert FILENAME to throw away all of the local changes.
Once the conflict is resolved, let Subversion know by running svn resolved. This removes the three temporary files and Subversion no longer considers the file to be in a state of conflict.
$ svn resolved sandwich.txt
Resolved conflicted state of 'sandwich.txt'
Merging conflicts by hand can be quite intimidating the first time you attempt it, but with a little practice, it can become as easy as falling off a bike.
Here's an example. Due to a miscommunication, you and Sally, your collaborator, both edit the file sandwich.txt at the same time. Sally commits her changes, and when you go to update your working copy, you get a conflict and you're going to have to edit sandwich.txt to resolve the conflicts. First, let's take a look at the file:
$ cat sandwich.txt
Top piece of bread
Mayonnaise
Lettuce
Tomato
Provolone
<<<<<<< .mine
Salami
Mortadella
Prosciutto
=======
Sauerkraut
Grilled Chicken
>>>>>>> .r2
Creole Mustard
Bottom piece of bread
The strings of less-than signs, equal signs, and greater-than signs are conflict markers, and are not part of the actual data in conflict. You generally want to ensure that those are removed from the file before your next commit. The text between the first two sets of markers is composed of the changes you made in the conflicting area:
<<<<<<< .mine
Salami
Mortadella
Prosciutto
=======
The text between the second and third sets of conflict markers is the text from Sally's commit:
=======
Sauerkraut
Grilled Chicken
>>>>>>> .r2
Usually you won't want to just delete the conflict markers and Sally's changes -- she's going to be awfully surprised when the sandwich arrives and it's not what she wanted. So this is where you pick up the phone or walk across the office and explain to Sally that you can't get sauerkraut from an Italian deli. Once you've agreed on the changes to check in, edit your file and remove the conflict markers.
Top piece of bread
Mayonnaise
Lettuce
Tomato
Provolone
Salami
Mortadella
Prosciutto
Creole Mustard
Bottom piece of bread
Now run svn resolved, and you're ready to commit your changes:
$ svn resolved sandwich.txt
$ svn commit -m "Go ahead and use my sandwich, discarding Sally's edits."
Note that svn resolved, unlike most of the other commands we deal with in this chapter, requires an argument. In any case, you want to be careful and only run svn resolved when you're certain that you've fixed the conflict in your file -- once the temporary files are removed, Subversion lets you commit the file even if it still contains conflict markers.
If you ever get confused while editing the conflicted file, you can always consult the three files that Subversion creates for you in your working copy -- including your file as it was before you updated. You can even use a third-party interactive merging tool to examine those three files.
4.10. Copying a File Onto Your Working File
If you get a conflict and decide that you want to throw out your changes, you can merely copy one of the temporary files created by Subversion over the file in your working copy:
$ svn update
C  sandwich.txt
Updated to revision 2.
$ ls sandwich.*
sandwich.txt  sandwich.txt.mine  sandwich.txt.r2  sandwich.txt.r1
$ cp sandwich.txt.r2 sandwich.txt
$ svn resolved sandwich.txt
If you get a conflict, and upon examination decide that you want to throw out your changes and start your edits again, just revert your changes:
$ svn revert sandwich.txt
Reverted 'sandwich.txt'
$ ls sandwich.*
sandwich.txt
Note that when you revert a conflicted file, you don't have to run svn resolved.
4.11. Commit Your Changes
Finally! Your edits are finished, you've merged all changes from the server, and you're ready to commit your changes to the repository.
The svn commit command sends all of your changes to the repository. When you commit a change, you need to supply a log message, describing your change and why you made it, if relevant. Your log message is attached to the new revision you create. If your log message is brief, you may wish to supply it on the command line using the --message (or -m) option:
$ svn commit -m "Corrected number of cheese slices."
Sending        sandwich.txt
Transmitting file data .
Committed revision 3.
However, if you've been composing your log message as you work, you may want to tell Subversion to get the message from a file by passing the filename with the --file (-F) option:
$ svn commit -F logmsg
Sending        sandwich.txt
Transmitting file data .
Committed revision 4.
If you fail to specify either the --message or --file option, then Subversion automatically starts your system default editor for composing a log message.
If you're in your editor writing a commit message and decide that you want to cancel your commit, you can just quit your editor without saving changes. If you've already saved your commit message, simply delete the text, save again, then abort.
$ svn commit
Waiting for Emacs...Done

Log message unchanged or not specified
a)bort, c)ontinue, e)dit
a
$
The repository doesn't know or care if your changes make any sense as a whole; it only checks to make sure that nobody else has changed any of the same files that you did when you weren't looking. If somebody has done that, the entire commit fails with a message informing you that one or more of your files is out-of-date:
$ svn commit -m "Add another rule"
Sending        rules.txt
svn: Commit failed (details follow):
svn: Your file or directory 'sandwich.txt' is probably out-of-date
(The exact wording of this error message depends on the network protocol and server you're using, but the idea is the same in all cases.)
At this point, you need to run svn update, deal with any merges or conflicts that result, and attempt your commit again.
That covers the basic work cycle for using Subversion. There are many other features in Subversion that you can use to manage your repository and working copy, but most of your day-to-day use of Subversion involves only the commands discussed in this chapter.
4.11.1. Exercise - Commit Code to the Repository
Commit your local changes to the repository. The account information for writing to the repository can be found in Appendix A.
Blog about the process. Did your commit work the first time? If not, why not? Were there conflicts? What did you do to resolve them?
4.12. Supplemental Reading
There are important differences between a client-server SCM, such as Subversion or CVS, and a distributed SCM, such as Mercurial or Git. In the client-server model, developers use a shared single repository; in the distributed model, each developer works directly with their own local repository, and changes are shared between repositories as a separate step.
Subversion is a great SCM to learn for those who want to make the jump to distributed SCMs. Here are two excellent guides:
4.13. Supplemental Exercises
Freeciv is one of the most popular FOSS games, and it's all hosted in a Subversion repository. Go to the
Freeciv developer site and download the code from both HEAD and the latest
release tag. Download them into separate directories. Do your best to figure out what the current differences are, and summarize those differences in a blog post. (Note: this might take a while.)
Chapter 5. Building the Code
5.1. From Source to Executable
Now you know how source control works, and you've got a gigantic pile of source code sitting in a directory.
What do you do with it?
The process of turning source code into executable binary code can be extremely complicated. The more source code you have, the more complicated that process is. Almost every serious piece of software has its own build process, that every developer must follow -- and woe be unto the developer who repeatedly breaks the build for everyone else.
In this chapter, you learn about how software is built. You learn about how the build process works in general, about some tools that you are likely to see, and you walk through a build for a FOSS project to see how it works in practice.
5.2. What is Building, Exactly?
There are many steps in the process of turning source code into a binary executable. Some examples of tasks that you might encounter during a typical build process:
- Compiling the code
Source code must somehow become machine code, ultimately. Sometimes this is handled in real-time by an interpreter, as in the case of scripting languages such as Perl or Javascript. For more complex applications, though, this work is usually handled by a compiler. Therefore, you must ensure that you have a proper compiler installed, and that you are calling the compiler properly with the correct compiler options.
- Linking object files and libraries
In the modern world, it's crazy to write all of the code yourself. When you want to write output to the screen, you don't write code that talks directly to the monitor; you use a library that handles input and output. When you want to play audio, you don't handcode the waveforms yourself; you use audio codecs. When you compile the code, you almost always need to include libraries of one kind or another -- which means you must know which libraries you need, and you must ensure that the libraries are where the compiler expects them to be, and that the libraries are all of the right version.
- Determining build order and dependencies
In complex software projects, it's vital to keep track of dependencies. A change to code in a single library can have effects across your entire project, and might require some or all of your code to be recompiled -- and often in a particular order. Keeping track of dozens of libraries, and references to those libraries by hundreds of source files, can be an ugly business.
- Testing the build results
It's essential to know when you've introduced bugs sooner rather than later; new bugs are often easy to fix, and old bugs are often not so easy to fix. Also, it frequently happens that bugs, once fixed, creep back into code. Running basic tests on a project every time it's built can be a good way to ensure that bugs get fixed and stay fixed.
- Packaging and/or Deploying
Sometimes you want to install the program you just compiled so that it can be run from anyhere on the system, and other programs or users can find it. Or sometimes you want to bundle it up into a format that allows anyone to take your executable and install it easily for themselves. You don't want to do this for every build, but when you know that your build is good, one of the important final steps is to put the executable, and all documentation, in a central location.
Performing all of these tasks by hand would be time-consuming and difficult. Build automation tools allow the developer to handle all of these tasks automatically -- and thus, to manage projects with a much higher degree of complexity.
5.3. Living With Complexity
Fair warning: sometimes code doesn't compile. Sometimes you follow all the instructions, and it still doesn't work. What then?
If this is your first experience dealing with a large codebase written by someone else, then welcome to the real world. As you run your first build, you may have very little idea of what's actually going on. Don't get discouraged. Have patience; you'll soon begin to figure it all out.
You are about to walk through a software build process. The typical build command might return hundreds, or even thousands, of log entries, all of which scroll across the screen at lightning speed. You may understand all, some, or none of those entries.
That's okay. Everyone starts somewhere.
Here are some points to keep in mind.
- Read instructions carefully
Almost every sizable FOSS project has a README or an INSTALL file that provides instructions for how to build and install the software. Read those instructions, and do your best to follow them to the letter. Understand that even the best instructions may leave out a step or two -- and these are opportunities to improve the project.
- Don't expect to understand every word
Very few developers understand every single word of every build log they encounter. Learning to distinguish between the important messages and the spurious messages takes time. Don't be intimidated.
- Read logs carefully and thoughtfully
When you see an error, read back and think about what it could mean. Does the error say "couldn't find something"? That probably means you didn't install a library dependency properly. Was the error you found the only error in the log? In a 1000-line build log, the error at the end could be the result of another error dozens, or hundreds, of lines earlier. If your build doesn't end happily, don't panic. Relax and work your way through the problem.
- Google is your friend
If you don't understand an error message, just Google it! Googling an error message can be a surprisingly effective method for determining what's gone wrong. There's a decent chance that someone before you has run into the same error, and someone has posted the solution to your problem on a message board or mailing list. Even if the answer isn't obvious, there will frequently be clues. The Internet is a gigantic resource. Use it.
- Ask for help
If you've done your homework and still can't figure out why your program isn't building, get on the project's mailing list, message board, or IRC channel, and ask for help. The more you've dug into the problem, and the more information you provide, the more likely it is that developers will help you figure out the problem.
Now it's time to get on with it.
If you are working on a project that is written in C or C++, and that project is designed to run on Linux or UNIX, then it's incredibly likely that you will be seeing GNU Autotools at work.
Developers use GNU Autotools to make sure that their users (that's you) can compile and run a piece of software across a wide variety of hardware and software configurations.
You are now going to walk through the building of Freeciv. You checked out a local working repository of Freeciv in the last chapter, right? Now it's time to turn all that code into a playable binary executable of the latest and awesomest version of Freeciv.
Follow along with the sample build process, below.
As you proceed through the build process, you may see many of the same errors; you may see completely different errors. No matter what happens, keep calm and carry on. Read the instructions. Don't expect to understand every word. Read logs carefully and thoughtfully. Google is your friend. Ask for help.
5.4.1. Finding the Installation Instructions
Look for an INSTALL file in the top-level directory of the local repository. If you don't find an INSTALL file, look for a README file. If you don't find a README file, look for a script called configure and run it. And if you don't find that, send a nice email to the maintainers of the project, and ask them if they could use some help with their installation instructions.
Oh, look, there's an INSTALL file right there in the top level directory of the freeciv folder.
The version of the INSTALL file referred to here is dated 22-Oct-2009.
If it's way out of date, then you'll just have to buy the next edition of the textbook. Just kidding! Send in a patch, and we'll fix it.
5.5. Installing Prerequisites
Every good INSTALL file tells you what the prerequisites are. If you find an INSTALL file that doesn't, offer to fix it.
Freeciv does, though. Right there in the table of contents:
0. Prerequisites:
1. Prerequisites for the clients:
     1a. Prerequisites for the Gtk+ client:
     1b. Prerequisites for the SDL client:
     1c. Prerequisites for the Xaw client:
There are two sets of requirements. One set of requirements is listed for general building with the following list:
Unix (or similar).
An ANSI C compiler
A "make" program
The programs from GNU gettext version 0.10.36 or better
GNU autoconf, version 2.58 or better
GNU automake, version 1.6 or better
Then another set of requirements is required for building the Freeciv clients, which can actually be compiled in different flavors, and each flavor has a different set of dependencies. You are just building the Gtk+ client, which means:
pkg-config
"Glib" greater or equal to 2.4.0
The "Atk" accessibility library
The "Pango" text layout and rendering library
The "Gtk+" widget library greater or equal to 2.4.0
That's a lot of stuff. How do you get all that stuff?
This is where Linux distributions shine. All modern Linux distributions have package management programs that allow for easy location and installation of FOSS software. In this example case, presume the Fedora distribution, but Ubuntu uses similar commands and works in largely the same way.
First, make sure that you have a C compiler. In fact, use the compiler that Freeciv recommends in the INSTALL file: gcc.
[gregdek@ip-10-242-118-147 freeciv]$ rpm -q gcc
package gcc is not installed
Hm! You have your first problem.
RPM is a program that maintains a list of software packages installed on the system. With this command, you asked, "tell me if you have gcc installed". And RPM said "nope, sorry." Which means you turn to RPM's big brother, yum. (In the Ubuntu/Debian world, these commands would be dpkg and apt-get, respectively.)
Next you ask yum to install gcc:
[gregdek@ip-10-242-118-147 freeciv]$ yum install gcc
Loaded plugins: fastestmirror
You need to be root to perform this command.
Oh, right. If you're going to work with Linux, you need to know when you need to be regular user, and when you need to be root. When you're adding new software to the system, to be accessed by other programs and potentially other users, you need to be root. (You can also use the su -c command, which allows you to masquerade as root.)
[root@ip-10-242-118-147 ~]# yum install gcc
Loaded plugins: fastestmirror
Determining fastest mirrors
 * updates-newkey: kdeforge.unl.edu
 * fedora: kdeforge.unl.edu
 * updates: kdeforge.unl.edu
updates-newkey                                           | 2.3 kB     00:00
fedora                                                   | 2.1 kB     00:00
updates                                                  | 2.6 kB     00:00
Setting up Install Process
Parsing package install arguments
Resolving Dependencies
--> Running transaction check
---> Package gcc.i386 0:4.1.2-33 set to be updated
--> Processing Dependency: glibc-devel >= 2.2.90-12 for package: gcc
--> Running transaction check
---> Package glibc-devel.i386 0:2.7-2 set to be updated
--> Finished Dependency Resolution

Dependencies Resolved

================================================================================
 Package               Arch           Version            Repository        Size
================================================================================
Installing:
 gcc                   i386           4.1.2-33           fedora           5.2 M
Installing for dependencies:
 glibc-devel           i386           2.7-2              fedora           2.0 M

Transaction Summary
================================================================================
Install      2 Package(s)
Update       0 Package(s)
Remove       0 Package(s)

Total download size: 7.2 M
Is this ok [y/N]:
Lots of interesting information here! And you already start to see how software fits together. The programs yum and rpm work together to make sure that when you choose to install gcc, you also get everything that gcc needs to be useful -- in this case, the header and object files necessary for developing programs that use the standard C libraries. You asked for one software package, but now you get two.
Answer yes:
Is this ok [y/N]: y
Downloading Packages:
(1/2): glibc-devel-2.7-2.i386.rpm                        | 2.0 MB     00:00
(2/2): gcc-4.1.2-33.i386.rpm                             | 5.2 MB     00:00
--------------------------------------------------------------------------------
Total                                           6.4 MB/s | 7.2 MB     00:01
============================== Entering rpm code ===============================
Running rpm_check_debug
Running Transaction Test
Finished Transaction Test
Transaction Test Succeeded
Running Transaction
  Installing     : glibc-devel                                              1/2
  Installing     : gcc                                                      2/2
=============================== Leaving rpm code ===============================

Installed:
  gcc.i386 0:4.1.2-33

Dependency Installed:
  glibc-devel.i386 0:2.7-2

Complete!
All right, that's one dependency down. Which also means that you can build anything that needs GCC in the future, so that's useful.
Now you need a make program. They recommend gmake, so see if it's installed.
[root@ip-10-242-118-147 ~]# rpm -q gmake
package gmake is not installed
All right, install it.
[root@ip-10-242-118-147 ~]# yum install gmake
Loaded plugins: fastestmirror
Loading mirror speeds from cached hostfile
 * updates-newkey: kdeforge.unl.edu
 * fedora: kdeforge.unl.edu
 * updates: kdeforge.unl.edu
Setting up Install Process
Parsing package install arguments
No package gmake available.
Nothing to do
Wait, what's this? It appears that gmake isn't installed, and isn't available? What's going on?
Well, upon reading the INSTALL instructions more closely, there is this nugget:
   You can check if you have GNU make installed on your system by
   typing:

    % make -v                   [and if this doesn't work, try "gmake -v"]

   The output should include "GNU Make" somewhere.
Get in the habit of reading instructions.
[root@ip-10-242-118-147 ~]# make -v
GNU Make 3.81
Copyright (C) 2006  Free Software Foundation, Inc.
This is free software; see the source for copying conditions.
There is NO warranty; not even for MERCHANTABILITY or FITNESS FOR A
PARTICULAR PURPOSE.

This program built for i386-redhat-linux-gnu
All right, you've got make. How about GNU gettext?
[root@ip-10-242-118-147 ~]# rpm -q gettext
gettext-0.16.1-12.fc8
Very good. Autoconf?
[root@ip-10-242-118-147 ~]# rpm -q autoconf
package autoconf is not installed
[root@ip-10-242-118-147 ~]# yum install -y autoconf

(snip lots of yum output)

Installed:
  autoconf.noarch 0:2.61-9.fc8

Dependency Installed:
  imake.i386 0:1.0.2-5.fc8

Complete!
All set. Automake?
[root@ip-10-242-118-147 ~]# yum install -y automake

(snip lots of yum output)

Installed:
  automake.noarch 0:1.10-6

Complete!
Note that this time you didn't even bother to see if the RPM was installed first; you just installed it, because if automake had already been installed, yum would have let us know:
[root@ip-10-242-118-147 ~]# yum install -y automake
Loaded plugins: fastestmirror
Loading mirror speeds from cached hostfile
 * updates-newkey: kdeforge.unl.edu
 * fedora: kdeforge.unl.edu
 * updates: kdeforge.unl.edu
Setting up Install Process
Parsing package install arguments
Package automake-1.10-6.noarch already installed and latest version
Nothing to do
That's half of the prerequisites. Time for the other half.
[root@ip-10-242-118-147 ~]# yum install pkg-config
(snip)
No package pkg-config available.
Nothing to do

[root@ip-10-242-118-147 ~]# yum install pkgconfig
(snip)
Package 1:pkgconfig-0.22-4.fc8.i386 already installed and latest version
Nothing to do
Okay, so you've got pkg-config installed, even though they seem to be calling it pkgconfig for some reason, which was discovered through a lucky guess -- noting that in the INSTALL file, even though they call it pkg-config, the file in question is called pkgconfig-0.14.0.tar.gz. These kinds of little inconsistencies are maddening, and you will find them everywhere in your software life, so get used to them.
Now for Glib:
[root@ip-10-242-118-147 ~]# yum install Glib
(snip)
No package Glib available.
  * Maybe you meant: glib
Nothing to do
Oh, maybe you did mean glib. Thanks!
[root@ip-10-242-118-147 ~]# yum install glib
(snip)
Installed:
  glib.i386 1:1.2.10-28.fc8

Complete!
This is kind of slow, isn't it? Can you specify multiple packages to be installed at once? Indeed you can.
[root@ip-10-242-118-147 ~]# yum install atk pango gtk+
(snip)
Package atk-1.20.0-1.fc8.i386 already installed and latest version
(snip)
Installed:
  gtk+.i386 1:1.2.10-59.fc8              pango.i386 0:1.18.4-1.fc8

Dependency Installed:
  cairo.i386 0:1.4.14-1.fc8                   libX11.i386 0:1.1.3-4.fc8
  libXext.i386 0:1.0.1-4.fc8                  libXft.i386 0:2.1.12-3.fc8
  libXi.i386 0:1.1.3-1.fc8                    libXrender.i386 0:0.9.4-1.fc8
  xorg-x11-filesystem.noarch 0:7.1-2.fc6

Complete!
Whew. At long last, you're done.
Or so it would appear -- but appearances can be deceiving.
Once you have all of the prerequisites installed, the next step is to run the configure script.
The configure script, in this case, is generated by the GNU Autotools, a set of tools that examine lots and lots (and lots and lots) of variables about your system. It checks your compiler, it checks your hardware, it checks all kinds of stuff, and as a result of all of these checks (literally hundreds), it builds a makefile that the compiler uses to build the binary executable.
Simple, right? Give it a try. But first, read the instructions:
2. Generating Makefiles
=======================
This section contains two parts, one for generating makefiles from svn
versions and one for generating makefiles from release versions.

2a. Generating the Makefile for svn versions:
=============================================

This step is only needed for svn versions.

To create the makefile just type

 % ./autogen.sh

This will create the configure script and will run it. All parameters
of autogen.sh are passed to configure. Read the next section about the
parameters which can be passed to configure.
All right, seems simple enough. Run it and see what happens:
[gregdek@ip-10-242-118-147 freeciv]$ ./autogen.sh
+ checking for autoconf >= 2.58 ... found 2.61, ok.
+ checking for autoheader >= 2.58 ... found 2.61, ok.
+ checking for automake >= 1.6 ... found 1.10, ok.
+ checking for aclocal >= 1.6 ... found 1.10, ok.
+ checking for libtoolize >= 1.4.3 ...
You must have libtoolize installed to compile freeciv.
Download the appropriate package for your distribution,
or get the source tarball at ftp://ftp.gnu.org/pub/gnu/libtool/
+ checking for xgettext >= 0.10.36 ... found 0.16.1, ok.
+ checking for msgfmt >= 0.10.36 ... found 0.16.1, ok.
Oops. Looks like the script found a missing dependency that's not documented! Fortunately, GNU Autotools found it. Install libtoolize -- or libtool, which is it? Anyway, it's probably one of them:
[root@ip-10-242-118-147 FREECIV]# yum install libtoolize
(snip)
No package libtoolize available.
Nothing to do
[root@ip-10-242-118-147 FREECIV]# yum install libtool
(snip)
Installed:
  libtool.i386 0:1.5.24-3.fc8

Complete!
All right, try that again.
[gregdek@ip-10-242-118-147 freeciv]$ ./autogen.sh
+ checking for autoconf >= 2.58 ... found 2.61, ok.
+ checking for autoheader >= 2.58 ... found 2.61, ok.
+ checking for automake >= 1.6 ... found 1.10, ok.
+ checking for aclocal >= 1.6 ... found 1.10, ok.
+ checking for libtoolize >= 1.4.3 ... found 1.5.24, ok.
+ checking for xgettext >= 0.10.36 ... found 0.16.1, ok.
+ checking for msgfmt >= 0.10.36 ... found 0.16.1, ok.
+ running aclocal ...
+ running autoheader ...
+ running autoconf ...
+ running libtoolize ...
Putting files in AC_CONFIG_AUX_DIR, `bootstrap'.
+ running automake ...
configure.ac:63: installing `bootstrap/missing'
configure.ac:63: installing `bootstrap/install-sh'
ai/Makefile.am: installing `bootstrap/depcomp'
common/Makefile.am:97: `%'-style pattern rules are a GNU make extension
utility/Makefile.am:60: `%'-style pattern rules are a GNU make extension
+ removing config.cache ...
+ running configure ...

I am going to run ./configure with no arguments - if you wish
to pass any to it, please specify them on the ./autogen.sh command line.
OK, so far so good! It's successfully created a configure script, and now it's running that script. Fingers crossed...
checking build system type... i686-pc-linux-gnu
checking host system type... i686-pc-linux-gnu
checking for a BSD-compatible install... /usr/bin/install -c
checking whether build environment is sane... yes
checking for a thread-safe mkdir -p... /bin/mkdir -p
checking for gawk... gawk
checking whether make sets $(MAKE)... yes
checking for style of include used by make... GNU
checking for gcc... gcc
checking for C compiler default output file name... a.out
checking whether the C compiler works... yes
checking whether we are cross compiling... no
checking for suffix of executables...
checking for suffix of object files... o
checking whether we are using the GNU C compiler... yes
checking whether gcc accepts -g... yes
checking for gcc option to accept ISO C89... none needed
checking dependency style of gcc... gcc3
checking how to run the C preprocessor... gcc -E
checking for grep that handles long lines and -e... /bin/grep
checking for egrep... /bin/grep -E
checking for ANSI C header files... yes
checking for sys/types.h... yes
checking for sys/stat.h... yes
checking for stdlib.h... yes
checking for string.h... yes
checking for memory.h... yes
checking for strings.h... yes
checking for inttypes.h... yes
checking for stdint.h... yes
checking for unistd.h... yes
checking for gethostbyname2... yes
checking for inet_pton... yes
checking for inet_ntop... yes
checking for getnameinfo... yes
checking for AF_INET6... yes
checking for a sed that does not truncate output... /bin/sed
checking for gawk... (cached) gawk
checking for gcc... (cached) gcc
checking whether we are using the GNU C compiler... (cached) yes
checking whether gcc accepts -g... (cached) yes
checking for gcc option to accept ISO C89... (cached) none needed
checking dependency style of gcc... (cached) gcc3
checking how to run the C preprocessor... gcc -E
checking for g++... no
checking for c++... no
checking for gpp... no
checking for aCC... no
checking for CC... no
checking for cxx... no
checking for cc++... no
checking for cl.exe... no
checking for FCC... no
checking for KCC... no
checking for RCC... no
checking for xlC_r... no
checking for xlC... no
checking whether we are using the GNU C++ compiler... no
checking whether g++ accepts -g... no
checking dependency style of g++... none
checking whether the C++ compiler works... no
configure: error: no acceptable C++ compiler found in $PATH
See `config.log' for more details.
Wait... what? But... but... it's written in C! Why do you need a C++ compiler for C?
Annoyed, Google "freeciv c++", looking for clues. (Remember: Google is your friend.) And on the first page of search results, there is this gem of wisdom:
"Freeciv is a free turn-based multiplayer strategy game, in which each player becomes the leader ... Mostly written in C."
Mostly written in C. Following a few links, discover that at least part of it is written in C++. Sigh. So, install the GNU C++ compiler -- Googling "gnu c++ fedora" tells us that the package name is likely called gcc-c++.
[root@ip-10-242-118-147 ~]# yum install gcc-c++
(snip)
Installed:
  gcc-c++.i386 0:4.1.2-33

Dependency Installed:
  libstdc++-devel.i386 0:4.1.2-33

Complete!
Try all that again.
[gregdek@ip-10-242-118-147 freeciv]$ ./autogen.sh
+ checking for autoconf >= 2.58 ... found 2.61, ok.
+ checking for autoheader >= 2.58 ... found 2.61, ok.
+ checking for automake >= 1.6 ... found 1.10, ok.
(snip to where we broke the last time...)
checking for g++... g++
checking whether we are using the GNU C++ compiler... yes
(snip to where we fail again...)
checking for gzgets in -lz... no
configure: error: Could not find zlib library.

configure failed
Another undocumented dependency.
So take stock at this point of where you are.
Freeciv is a good program. It runs on many platforms. There are dozens of active developers working on pieces of the codebase at any given time. And yet, in the space of 15 minutes, you have already found a handful of places where the documentation could be improved -- and you haven't even made it to a first successful build!
This is what complex software is like. Getting it 100% right is incredibly hard, and there are always little places to improve.
Anyway, back to business. Missing zlib? Install zlib.
[root@ip-10-242-118-147 ~]# yum install zlib
(snip)
Package zlib-1.2.3-14.fc8.i386 already installed and latest version
Nothing to do
That's odd. But Google is your friend, and Googling "freeciv zlib" leads to this exact problem -- and it's a common problem. You need development libraries for zlib.
Many FOSS projects split their libraries in two. They provide runtime libraries, and they provide development libraries. In fact, if you read the INSTALL document all the way down to section 10:
To compile freeciv on a debian system you need the following packages:

 Common requirements:
   gcc
   libc6-dev
   libreadline4-dev
   zlib1g-dev
   xlib6g-dev
Well, this isn't a Debian system, it's a Fedora system -- but the principle is the same. You need development libraries. Googling "fedora zlib" returns, in the top link, a reference to zlib-devel. So try that:
[root@ip-10-242-118-147 ~]# yum install zlib-devel
(snip)
Installed:
  zlib-devel.i386 0:1.2.3-14.fc8

Complete!
Try, try again.
[gregdek@ip-10-242-118-147 freeciv]$ ./autogen.sh
(snip to the next error...)
configure: error: could not guess which client to compile

configure failed
It clearly says in the INSTALL file (you did read the INSTALL file very closely, didn't you?) that "Gtk+" is the default client. So what guess is required?
Going back a little farther up in the log, though, you see the problem:
configure: checking for which client to compile:...
checking for pkg-config... /usr/bin/pkg-config
checking for GTK+ - version >= 2.4.0... no
*** Could not run GTK+ test program, checking why...
*** The test program failed to compile or link. See the file config.log for the
*** exact error that occured. This usually means GTK+ is incorrectly installed.
checking for sdl-config... no
checking for SDL - version >= 1.1.4... no
*** The sdl-config script installed by SDL could not be found
*** If SDL was installed in PREFIX, make sure PREFIX/bin is in
*** your path, or set the SDL_CONFIG environment variable to the
*** full path to sdl-config.
checking for X... no
checking whether Xfuncproto was supplied... no, found:  FUNCPROTO=15 NARROWPROTO
checking for Xfuncproto control definition FUNCPROTO... yes: 15
checking for Xfuncproto control definition NARROWPROTO... yes: 1
checking pkg-config is at least version 0.9.0... yes
checking for PNG... no
checking for png_read_image in -lpng12... no
checking for png_read_image in -lpng... no
checking png.h usability... no
checking png.h presence... no
checking for png.h... no
checking extra paths for Xpm... library no, include no
checking for XOpenDisplay in X library -lX11... no
checking will compile gui-ftwl... no
checking will compile gui-beos... no
configure: error: could not guess which client to compile

configure failed
It seems to want a GTK+ version of greater than 2.4.0. Isn't that what you installed?
[gregdek@ip-10-242-118-147 freeciv]$ rpm -q gtk+
gtk+-1.2.10-59.fc8
Hm! Stuck? Once again, Google is your friend. Google for "Fedora gtk+" and the very first link is to a discussion on a mailing list, where someone asks, "is there a gtk+2?" And a helpful Fedora community member says, "yes, but it's called gtk2".
So try that.
[root@ip-10-242-118-147 ~]# yum install gtk2
(snip)
Installed:
  gtk2.i386 0:2.12.8-2.fc8

Dependency Installed:
  cups-libs.i386 1:1.3.9-2.fc8          libXcomposite.i386 0:0.4.0-3.fc8
  libXcursor.i386 0:1.1.9-1.fc8         libXfixes.i386 0:4.0.3-2.fc8
  libXinerama.i386 0:1.0.2-3.fc8        libXrandr.i386 0:1.2.2-1.fc8

Complete!
OK, that's a lot of extra stuff, but if gtk2 needs it, then gtk2 needs it.
Try, try again.
(snip)
checking for GTK+ - version >= 2.4.0... no
*** Could not run GTK+ test program, checking why...
*** The test program failed to compile or link. See the file config.log for the
*** exact error that occured. This usually means GTK+ is incorrectly installed.
(snip)
configure: error: could not guess which client to compile

configure failed
Same exact error. Maybe there's a gtk2-devel?
[root@ip-10-242-118-147 ~]# yum install gtk2-devel
(snip)
Installed:
  gtk2-devel.i386 0:2.12.8-2.fc8

Dependency Installed:
  atk-devel.i386 0:1.20.0-1.fc8
  cairo-devel.i386 0:1.4.14-1.fc8
  docbook-dtds.noarch 0:1.0-33.fc8
  docbook-style-dsssl.noarch 0:1.79-4.1
  docbook-style-xsl.noarch 0:1.73.2-5.fc8
  docbook-utils.noarch 0:0.6.14-11.fc8
  fontconfig-devel.i386 0:2.4.2-5.fc8
  freetype-devel.i386 0:2.3.5-5.fc8
  gc.i386 0:7.0-6.fc8
  glib2-devel.i386 0:2.14.6-2.fc8
  gtk-doc.noarch 0:1.9-4.fc8
  libX11-devel.i386 0:1.1.3-4.fc8
  libXau-devel.i386 0:1.0.3-3.fc8
  libXcursor-devel.i386 0:1.1.9-1.fc8
  libXdamage.i386 0:1.1.1-3.fc8
  libXdmcp-devel.i386 0:1.0.2-4.fc8
  libXext-devel.i386 0:1.0.1-4.fc8
  libXfixes-devel.i386 0:4.0.3-2.fc8
  libXft-devel.i386 0:2.1.12-3.fc8
  libXi-devel.i386 0:1.1.3-1.fc8
  libXinerama-devel.i386 0:1.0.2-3.fc8
  libXrandr-devel.i386 0:1.2.2-1.fc8
  libXrender-devel.i386 0:0.9.4-1.fc8
  libXxf86vm.i386 0:1.0.1-4.fc8
  libpng-devel.i386 2:1.2.33-1.fc8
  libxcb-devel.i386 0:1.1-1.1.fc8
  mesa-libGL.i386 0:7.0.2-3.fc8
  mesa-libGL-devel.i386 0:7.0.2-3.fc8
  openjade.i386 0:1.3.2-30.fc8
  opensp.i386 0:1.5.2-6.fc8
  pango-devel.i386 0:1.18.4-1.fc8
  perl-SGMLSpm.noarch 0:1.03ii-16.2.1
  rarian.i386 0:0.6.0-4.fc8
  rarian-compat.i386 0:0.6.0-4.fc8
  sgml-common.noarch 0:0.6.3-21.fc8
  w3m.i386 0:0.5.2-5.fc8
  xml-common.noarch 0:0.6.3-21.fc8
  xorg-x11-proto-devel.noarch 0:7.3-3.fc8

Complete!
There is, indeed -- and it brings in a ton of dependencies! Including -devel versions of other dependencies you thought you'd satisfied, such as atk-devel and cairo-devel.
Imagine if you had to sort through all of these dependencies yourself, by hand. With all of the effort you've already gone through to identify and satisfy a relatively small number of dependencies, imagine the work that would be required. As imperfect as this process clearly is, it could be orders of magnitude worse.
Try, try again.
****************** Configuration Summary ******************

  Build freeciv client: yes
    Debugging support:  some

  Client frontends:
    Gtk-2.0: yes
    SDL:     no
    Xaw:     no
    Win32:   no
    FTWL:    no
    Stub:    no

  Build freeciv server:    yes
    Debugging support:     some
    Auth database support: no


Now type 'make' to compile freeciv.
Blink.
It worked! It worked it worked it worked it worked!
You are, at long last, ready to make.
Look, once again, at the excellent instructions:
If all has gone well previous to this point, then compiling Freeciv
should be as easy as typing "make" (or preferably, "gmake").

If you have problems, read the file BUGS, and follow the advice
carefully.  If the problem is with "gettext", please read the Native
Language Support section, below, for possible work-arounds.

After compilation, the important results are:

  - The "client/freeciv-<GUI>" and "server/freeciv-server" binaries.
  - The "data/" directory, which contains the graphics and scenarios.
  - The "po/" directory, which contains the localization files.
  - The "civ" and "ser" scripts.

It's perfectly feasible to play Freeciv in this directory, without
installing it.  If you do this, the "civ" and "ser" scripts may be
useful, although they are not as necessary as they used to be.

See the README file for more information.
Do as it says. In fact, try a new trick:
[gregdek@ip-10-242-118-147 freeciv]$ make 1>/tmp/freeciv-make.out 2>/tmp/freeciv-make.err &
[1] 1517
[gregdek@ip-10-242-118-147 freeciv]$
Compiling an entire software project can take quite a while, and generates a prodigious amount of data -- and watching a bazillion lines of code fly by is only fun for the first few seconds. So this old-school UNIX command lets you capture all that output to look at it later. The make command is the make command, of course. The 1>/tmp/freeciv-make.out option tells the job to put the standard output into /tmp/freeciv-make.out, and 2>/tmp/freeciv-make.err tells the job to put error messages into /tmp/freeciv-make.err, and & tells the job to run in the background, so that you can be free to do other things. When the job completes, it tells you so.
As a truly ridiculous amount of computation takes place, wander off for a cup of coffee, and take this time to engage in
serious business. When you come back, hit enter, and see on the screen:
[1]+ Done make > /tmp/freeciv-make.out 2> /tmp/freeciv-make.err
Ah, very good. Now have a look at the log files. How long are they? Here's the clever wc (word count) command, with the -l parameter to show the number of lines instead of number of words:
[gregdek@ip-10-242-118-147 freeciv]$ wc -l /tmp/freeciv-make.out
1148 /tmp/freeciv-make.out
[gregdek@ip-10-242-118-147 freeciv]$ wc -l /tmp/freeciv-make.err
551 /tmp/freeciv-make.err
[gregdek@ip-10-242-118-147 freeciv]$
Whoa! 551 errors? Take a look at that.
[gregdek@ip-10-242-118-147 freeciv]$ less /tmp/freeciv-make.err
The less command is a tool that allows you to scroll through a text file, search the file for text, and so on. The command man less gives you the manual page for the less command. For now, the page-up and page-down keys can take you through the file. Here are some sample lines from that error file:
packets_gen.c: In function 'receive_packet_spaceship_info_100':
packets_gen.c:23371: warning: dereferencing type-punned pointer will break strict-aliasing rules
packets_gen.c: In function 'send_packet_spaceship_info_100':
packets_gen.c:23560: warning: dereferencing type-punned pointer will break strict-aliasing rules
packets_gen.c: In function 'receive_packet_ruleset_unit_100':
packets_gen.c:23830: warning: dereferencing type-punned pointer will break strict-aliasing rules
packets_gen.c: In function 'send_packet_ruleset_unit_100':
packets_gen.c:24178: warning: dereferencing type-punned pointer will break strict-aliasing rules
packets_gen.c: In function 'receive_packet_ruleset_game_100':
packets_gen.c:24743: warning: dereferencing type-punned pointer will break strict-aliasing rules
packets_gen.c: In function 'send_packet_ruleset_game_100':
packets_gen.c:24824: warning: dereferencing type-punned pointer will break strict-aliasing rules
Hmm, lots and lots of warnings. In fact, paging up and down through the whole file quickly reveals that the error file is full of nothing but warnings. Not ideal, and maybe something that someone should fix (patches welcome), but generally, warnings don't prevent a program from compiling.
Next look at the regular output of the make. Actually, use the tail command, which just shows the end of the file (the last 10 lines by default):
[gregdek@ip-10-242-118-147 freeciv]$ tail /tmp/freeciv-make.out
gcc -DHAVE_CONFIG_H -I. -I..  -I../server -I../utility -I../common -I../ai -I../common/aicore \
-I../server/generator -I../client -I../client/include -DLOCALEDIR="\"/usr/local/share/locale\"" \
-DDEFAULT_DATA_PATH="\".:data:~/.freeciv/2.3:/usr/local/share/freeciv\"" -DDEFAULT_SAVES_PATH="\"\"" \
-DDEFAULT_SCENARIO_PATH="\".:data/scenario:~/.freeciv/scenarios:/usr/local/share/freeciv/scenario\""  \
-Wall -Wpointer-arith -Wcast-align -Wmissing-prototypes -Wmissing-declarations -g -O2 -MT civmanual.o \
-MD -MP -MF .deps/civmanual.Tpo -c -o civmanual.o civmanual.c
mv -f .deps/civmanual.Tpo .deps/civmanual.Po
/bin/sh ../libtool --preserve-dup-deps --tag=CC   --mode=link gcc  -Wall -Wpointer-arith -Wcast-align \
-Wmissing-prototypes -Wmissing-declarations -g -O2   -o civmanual civmanual.o ../server/libfreeciv-srv.la \
../client/helpdata.lo ../server/scripting/libscripting.la ../dependencies/lua-5.1/src/liblua.a \
../dependencies/toluaxx/src/lib/libtolua.a ../server/generator/libgenerator.la ../common/libfreeciv.la  -lm   -lz
mkdir .libs
gcc -Wall -Wpointer-arith -Wcast-align -Wmissing-prototypes -Wmissing-declarations -g -O2 -o civmanual \
civmanual.o ../client/helpdata.o  ../server/.libs/libfreeciv-srv.a ../server/scripting/.libs/libscripting.a \
../dependencies/lua-5.1/src/liblua.a ../dependencies/toluaxx/src/lib/libtolua.a \
../server/generator/.libs/libgenerator.a ../common/.libs/libfreeciv.a -lm -lz
make[2]: Leaving directory `/home/gregdek/FREECIV/freeciv/manual'
make[2]: Entering directory `/home/gregdek/FREECIV/freeciv'
make[2]: Nothing to be done for `all-am'.
make[2]: Leaving directory `/home/gregdek/FREECIV/freeciv'
make[1]: Leaving directory `/home/gregdek/FREECIV/freeciv'
[gregdek@ip-10-242-118-147 freeciv]$
That's what make looks like when it succeeds. Be sure that you successfully generated the important bits, as you recall from the INSTALL guide:
After compilation, the important results are:

  - The "client/freeciv-<GUI>" and "server/freeciv-server" binaries.
  - The "data/" directory, which contains the graphics and scenarios.
  - The "po/" directory, which contains the localization files.
  - The "civ" and "ser" scripts.
See if you find these by using the ls command.
[gregdek@ip-10-242-118-147 freeciv]$ ls client/freeciv-*
client/freeciv-gtk2
[gregdek@ip-10-242-118-147 freeciv]$ ls server/freeciv-server
server/freeciv-server
[gregdek@ip-10-242-118-147 freeciv]$ ls data/
Freeciv          civclient.dsc        freeciv-server.icns  isotrident
Freeciv.in       civclient.dsc.in     freeciv-server.png   isotrident.tilespec
Makefile         civserver.dsc        freeciv.rc           misc
Makefile.am      civserver.dsc.in     freeciv.rc-2.0       nation
Makefile.in      civserver.room       graphics             scenario
amplio           civserver.room.in    gtk_menus.xml        stdsounds
amplio.tilespec  default              helpdata.txt         stdsounds.soundspec
buildings        default.serv         hex2t                themes
civ1             flags                hex2t.tilespec       trident
civ1.serv        fonts                icons                trident.tilespec
civ2             freeciv-client.icns  isophex              wonders
civ2.serv        freeciv-client.png   isophex.tilespec
[gregdek@ip-10-242-118-147 freeciv]$ ls po/
ChangeLog       cs.gmo     es.gmo     he.po   nb.po      ro.po
Makefile        cs.po      es.po      hu.gmo  nl.gmo     ru.gmo
Makefile.in     da.gmo     et.gmo     hu.po   nl.po      ru.po
Makefile.in.in  da.po      et.po      it.gmo  no.gmo     statistics.rb
POTFILES        de.gmo     et.po.sig  it.po   no.po      sv.gmo
POTFILES.in     de.po      fa.gmo     ja.gmo  pl.gmo     sv.po
POTFILES.skip   el.gmo     fa.po      ja.po   pl.po      tr.gmo
ar.gmo          el.po      fi.gmo     ko.gmo  pt.gmo     tr.po
ar.po           en_GB.gmo  fi.po      ko.po   pt.po      uk.gmo
ca.gmo          en_GB.po   fr.gmo     lt.gmo  pt_BR.gmo  uk.po
ca.po           eo.gmo     fr.po      lt.po   pt_BR.po   zh_CN.gmo
check_po.pl     eo.po      he.gmo     nb.gmo  ro.gmo     zh_CN.po
[gregdek@ip-10-242-118-147 freeciv]$ ls civ
civ
[gregdek@ip-10-242-118-147 freeciv]$ ls ser
ser
[gregdek@ip-10-242-118-147 freeciv]$
That certainly looks like everything was generated -- but the proof is in the pudding. Does the code run? Run the ser script, which starts the freeciv server, just to make sure:
[gregdek@ip-10-242-118-147 freeciv]$ ./ser
This is the server for Freeciv version 2.2.99-dev
You can learn a lot about Freeciv at http://www.freeciv.org/
2: Loading rulesets
2: AI*1 has been added as Easy level AI-controlled player.
2: AI*2 has been added as Easy level AI-controlled player.
2: AI*3 has been added as Easy level AI-controlled player.
2: AI*4 has been added as Easy level AI-controlled player.
2: AI*5 has been added as Easy level AI-controlled player.
2: Now accepting new client connections.

For introductory help, type 'help'.
> quit
Goodbye.
[gregdek@ip-10-242-118-147 freeciv]$
It works! Of course, the only real way to tell if it works is to play a very long game of Freeciv, but that is an exercise left to the reader.
5.8. Review: What Just Happened?
Now that you've successfully transformed code into gold, step back and take a look at what's going on. The process you just walked through is virtually identical to a large number of FOSS projects, so you're likely to see it often.
Where do all of these complicated configuration files come from in the first place, and why?
The goal of good build tools is to allow the developer to describe the project as simply as possible. There's a lot of complexity, but it's important to isolate that complexity.
Developers of an Autotools-based project seek to describe the build process of the entire project in two files:
Makefile.am, which (basically) describes what needs to be built;
configure.in (or configure.ac), which (basically) describes how it needs to be built.
These descriptions start out simple, but as the project grows in complexity, the descriptions of the project naturally grow as well.
Given these configuration files, you ran through the Autotools suite. The purpose of the Autotools suite is to build a good configure script, which in turn builds a good Makefile, which in turn builds good executable binaries.
+--------------+
| configure.in |
| Makefile.am  |
+--------------+
       |
       | Run autogen.sh
       | (a wrapper for the Autogen tools)
       v
+--------------+
|  configure   |
+--------------+
       |
       | ./configure
       | (repeat as necessary)
       |
       v
+--------------+
|   Makefile   |
+--------------+
       |
       | make
       |
       v
+--------------+
|   Lots of    |
| successfully |
|  compiled    |
|    code      |
+--------------+
One of the things you did not do was to run the make install command.
That would install Freeciv as an "official" binary that could be run by anyone on the system. Since this is a development version, keep it in your own working directory, where you can happily break it as much as you want.
Again: very few people know every detail about Autotools, or about any build tools. Experienced developers know as much as they need to know to get the job done, and they know where to look for help when they're stuck.
5.9. Exercise - Building Your Developer Workstation
By now, you have probably chosen a FOSS project that interests you. Maybe you've been running that code from a pre-built binary that you downloaded, but now it's time to build the executables from scratch.
Go check out the project's codebase from its SCM. Walk through the entire build process. In some cases, this might be pretty simple; it some cases, it might be quite complicated. Use all of the tools available to you: install instructions, mailing lists, Google, IRC, etc. Build the code, and then run the code; that's your goal.
As you go through this build process, blog your process in a manner similar to how you walked through your build of Freeciv in this chapter.
If the build was easy, proceed to the next exercise: create two separate builds in two separate directories -- the latest stable release, and the release from HEAD. FOSS developers frequently do this to compare behaviors between versions.
5.10. Supplemental Reading
The Mozilla project uses GNU Autotools for all of their projects, and their
build documentation is available online. It's a great exercise for those who want experience with building complex software designed to run on multiple platforms.
For those who want to start their own project and want it to be
Autotools-friendly in the first place, here's a
great tutorial.
GNU Autotools is very common, and this book had to start somewhere with an exploration of build automation -- but there are lots of other excellent build tools. In the world of Java software,
Ant and
Maven are extremely popular choices. Here's a fairly comprehensive list of
popular build automation tools.
Building software can be frustrating, and a lot of FOSS projects do a lot of things wrong. To be clear: most proprietary software projects probably do a lot of things wrong too, but the failures of FOSS projects are visible for all to see -- and thus, to learn from.
Tom 'spot' Callaway has compiled a list of things that projects do wrong, in a piece entitled
How to tell if a FLOSS project is doomed to FAIL.
Chapter 7. Fixing_the_Code
Jeff Sheltren
Oregon State University (OSU) Open Source Labs (OSL)
jeff@osuosl.org7.1. Introduction: Patches Welcome
Most open source communities are very welcoming to people who are interested in fixing bugs or adding new features to a project. Patches are not only welcome, they are encouraged! It's important, however, to know how to create a proper patch and how to submit a patch to a community for possible integration into the code base.
This chapter introduces the patch file format and shows how to create and apply patches. It covers patches created both with and without a source code management (SCM) system, and introduces best practices to follow when creating patches and submitting those patches to a FOSS project.
A patch (also sometimes referred to as a diff) is a text file that shows changes to a file (or multiple files) as compared to a previous version. Typically, a patch shows line-by-line changes delineated with a '+' (plus sign) or '-' (minus sign) to represent additions and removals in the code, respectively. Certain patch formats also include surrounding lines of code to provide context and line numbers associated with the changes.
Patches are the preferred method for submitting changes to a FOSS project. This is because patches are a standard format and can be easily read and understood by developers familiar with the code base. A patch can include descriptions of multiple changes to multiple files, and this makes patches a great format for representing bug fixes or code enhancements that may touch many files within the larger project.
7.2.1. Example of a Simple Patch
In this example you generate a small change to a source code file to see how to create a patch. The file you start with is a simple Hello, World program hello.c written in C.
/* hello.c - a simple program to print out hello
 * to the screen
 */

#include <stdio.h>

int main() {
    printf("Hello, World.\n");
    return 0;
}
That output is not too exciting -- instead change the punctuation to an exclamation point to really get some enthusiasm! The first step in making a change is to create a copy of the file you are working on. If you are working on code that is in a revision control system this step won't be necessary. For now, assume this code is not checked out from a repository (you practice creating patches using Subversion later in this chapter.)
Next, create a backup copy of the file hello.c and name it hello.c.punct so that you know the file is related to your punctuation change.
$ cp hello.c hello.c.punct
Next edit hello.c and leave the backup copy hello.c.punct as-is. Using your favorite editor, open hello.c and change the '.' in the printf statement to be a '!'. Save the file and exit out of the editor. Now generate a patch showing the change that was made. To do this, use the diff command. Since the unified diff format is considered by many to be easier to read, generate a patch in that format by passing the -u flag to the diff command. Run the following command to have the patch printed out to your screen:
$ diff -u hello.c.punct hello.c
--- hello.c.punct       2010-03-11 07:57:04.000000000 -0800
+++ hello.c     2010-03-11 07:58:54.000000000 -0800
@@ -5,6 +5,6 @@
 #include <stdio.h>

 int main() {
-    printf("Hello, World.\n");
+    printf("Hello, World!\n");
     return 0;
 }
Examine the output from the diff command.
The first two lines represent the files that are being compared -- showing the file name as well as the last modified date.
Next are one or more hunks (pieces of a file) showing the differences between the files. In this case, you only have one change, so only one hunk is shown. Each hunk starts with the @@ text and numbers that represent the line numbers displayed in the change for the old (marked with a '-') and new (marked with a '+') files, respectively.
It then outputs the differences between the files. Since you used the -u flag to set the output to unified format, there are a number of lines shown that have not changed; these are output with a space in front of them.
Lines with a - in front of them have been removed from the first file.
Lines with a + in front of them are additions to the first file.
Notice that your one-line change is actually shown as the removal of an entire line and then an addition of a new, modified line.
When you ran the diff command you had it output to the screen. This can be useful when comparing things locally, but in order to share changes with others you should capture that output to a patch file. Use a simple shell redirect (>) to achieve this. In order to save the patch as hello-excitement.patch, the following command is used:
$ diff -u hello.c.punct hello.c > hello-excitement.patch
Run the diff command again, this time without the -u flag and compare the output to the output when the -u flag is used.
Patch files are most often created using the .patch file extension, although .diff is also common. Our recommendation is to use .patch as the file extension unless the project you are working on has a different naming convention. For the actual file name, it is best to use something descriptive without being too long. Spaces should be replaced with a dash (-) or an underscore (_) -- choose one and be consistent. It can also be helpful to include any applicable bug or ticket numbers should the patch fix something described in the project's bug tracking system. Look at the following example to get a better idea about how best to name a patch file.
Example: Fixing a bug that caused the date to be output in an incorrect format. This is bug #1517 in the project's bug tracking system.
Bad:   date.patch
Good:  format-date-output.patch
Best:  format-date-output-bug1517.patch
7.4. Comparing Multiple Files
The above example contained a relatively simple patch. In general, patches you encounter are likely to be much larger -- representing bigger changes to the code such as the addition of a new feature, or a bug or security fix that may touch multiple files within multiple directories of the code. These larger patches are still generated in the same manner by using the diff command. Instead of comparing two files, diff can be used to compare two directories and all of the files contained within.
Extend the example above by working with a directory, hello/, that contains two files: the hello.c program you started with in the first example plus a README file that describes the program. The directory contents and the README file contents are shown below:
$ ls hello/
hello.c  README
$ cat hello/README
This is a simple program which outputs "hello" to the screen.
You are going to be making changes to each of these files, so instead of making a backup of each file within the hello/ directory, copy the entire directory:
$ cp -r hello hello.orig
Now edit the files in the hello/ directory to include the exclamation point in the printf statement in hello.c and to update the README file to contain:
This is a simple program which outputs "hello" to the screen in an enthusiastic manner.
To create a patch file showing the changes, pass it the directory names rather than the file names:
$ diff -u hello.orig hello
diff -u hello.orig/hello.c hello/hello.c
--- hello.orig/hello.c  2010-03-11 09:11:29.612888467 -0800
+++ hello/hello.c   2010-03-11 09:14:39.406763357 -0800
@@ -5,6 +5,6 @@
 #include <stdio.h>

 int main() {
-    printf("Hello, World.\n");
+    printf("Hello, World!\n");
     return 0;
 }
diff -u hello.orig/README hello/README
--- hello.orig/README   2010-03-11 09:11:29.612888467 -0800
+++ hello/README    2010-03-11 09:14:58.175763807 -0800
@@ -1 +1 @@
-This is a simple program which outputs "hello" to the screen.
+This is a simple program which outputs "hello" to the screen in an enthusiastic manner.
The output is similar to the previous example, however there are now multiple hunks shown -- one for each change. In this manner, you can create large changes that touch multiple files and encapsulate all of those changes in a single patch file to easily share with others.
$ diff -u hello.orig hello > hello-excitement-exercise-X.Y.patch
7.5. Patches Generated with Subversion
If you read
Chapter 4, Getting the Code about source control management, you may recall seeing a similar diff displayed by using the
svn diff command. If you make changes to your working copy of a Subversion repository, you are able to see those changes compared to the latest revision you have checked out by running the
svn diff command. The format output by
svn is similar to what the
diff -u command generates, however,
svn is comparing revisions of the same file instead of two different files. If you were using Subversion in the first example above, the output from
svn diff would look similar to this:
$ svn diff
Index: hello.c
===================================================================
--- hello.c (revision 1)
+++ hello.c (working copy)
@@ -5,6 +5,6 @@
 #include <stdio.h>

 int main() {
-    printf("Hello, World.\n");
+    printf("Hello, World!\n");
     return 0;
 }
Notice that the lines representing the file names in the svn diff output appear slightly different than what you saw from the diff -u command. In this case, you are comparing your current working copy to revision 1 of the repository. Other than that, the output should look very similar. As with the diff command, you can redirect the output of svn diff to create a patch file.
$ svn diff > hello-excitement.patch
When using Subversion or another SCM, you generally want to create patches against the latest HEAD code from the repository. This means that you should run svn update or similar before creating your patch. This makes it easier for the project's maintainers to include your patch once you submit it.
You've looked at one side of the patch process, creating a patch to describe changes to a code base. The other side of patching is being able to apply a patch to an unchanged (also known as pristine or vanilla) code base. Patches are created using the diff command and are applied using the patch command. In the simplest form, a patch can be applied by feeding the input of a patch file into the patch command:
$ patch < new-feature.patch
The above command assumes that the files to be patched are located in the same directory in which you are running the patch command. Another common way to run patch is using the -p flag followed by a number indicating the number of directory layers to strip off of the filenames specified in the patch. This makes sense when running patch from the root directory of the code in question. Using -p0 passes patch the entire filename unmodified. This is generally the standard for submitted patches.
$ patch -p0 < fix-output-display.patch
Of course, whether you use -p0, -p1, or no -p flag at all depends on how the patch was created. The patch manual page (accessed by typing man patch on the command line of a Linux machine) contains a description of the -p and other options that can be used with the patch command.
Once you have created a patch that you would like to see included in a FOSS project, it's important to submit the patch in a manner appropriate for that project. In some cases, this may mean creating a patch with certain flags passed to the diff command; in other cases, it may mean writing an email to a development email list attaching your patch file and writing a description of the code change. When in doubt, ask a developer! Most developers would be very happy to help you submit your first patch as they know it may lead to you contributing even more to the project.
Here are some general guidelines to follow submitting a patch:
If your patch is related to an existing ticket or bug report, either update the ticket to include your patch or if the patch needs to be submitted externally, be sure to reference the bug or ticket number so that people are aware of the connection.
In most cases, you should create a patch against the current HEAD of the development tree. If your patch was created against another version of the code, be sure to make that known.
Don't be surprised or offended if your patch is not accepted for inclusion into a project's code. This can happen for a number of reasons:
Your code may not meet coding guidelines for the project. Don't let this discourage you. This is a great opportunity to improve your coding skills by learning what is required for this particular project and then re-submit another patch.
One of the main developers on the project may think you've provided a useful idea, but that it may need to be implemented in a different way. Again, don't get discouraged should this happen, but try to use it as a learning opportunity.
7.8. Exercise - Create a Patch for a New File
Create a patch file that represents a new file, foo being created with the contents bar. Hint: on Linux systems, the file /dev/null represents an empty file -- use that as one of the files you are comparing.
7.9. Exercise - Patch echo
Patch the echo command from the coreutils project so that it echoes out arguments in reverse order.
$ curl -O http://ftp.gnu.org/gnu/coreutils/coreutils-8.4.tar.gz
Open the tarball to create a coreutils-8.4 directory containing the source code:
$ tar zxf coreutils-8.4.tar.gz
Edit the file src/echo.c in order to modify the echo command. First, create a backup copy of that file:
$ cd coreutils-8.4/src
$ cp echo.c echo.c.reverse
Now, edit the file echo.c. The code to modify is near the very bottom of the file -- go to line 261 and change the following block of code:
while (argc > 0)
        {
          fputs (argv[0], stdout);
          argc--;
          argv++;
          if (argc > 0)
            putchar (' ');
        }
Update the code to be:
while (argc > 0)
        {
          argc--;
          fputs (argv[argc], stdout);
          if (argc > 0)
            putchar (' ');
        }
Create a patch to represent your change by changing in to the directory and running the following diff command:
$ cd coreutils-8.4
$ diff -u src/echo.c.reverse src/echo.c > echo-reverse-output.patch
Your patch file should look something like:
--- src/echo.c.reverse  2010-03-14 09:45:40.959888410 -0700
+++ src/echo.c  2010-03-14 09:51:58.189768045 -0700
@@ -260,9 +260,8 @@
     {
       while (argc > 0)
         {
-          fputs (argv[0], stdout);
           argc--;
-          argv++;
+          fputs (argv[0], stdout);
           if (argc > 0)
             putchar (' ');
         }
If you want to test out your changes, run the following commands to build the code:
$ ./configure$ make
You should now have a working echo binary. You can run the following command to test it out:
$ src/echo is this reversedreversed this is
7.10. Exercise - Fix a Real FOSS Bug
Look through the bug tracking system for a project that you are interested in and find a small bug to fix. Create a patch file for that bug and submit it to the project for inclusion in the code.
Chapter 8. Explaining the Code
People are going to tell you documentation doesn't matter. In a perfect world, it doesn't! If all code were self-evident and all programs worked for users without needing help, if all work and communities were easy to participate in, perhaps we could do without documentation. Of course, that would require all people to think and act in similar ways; we may never be without documentation simply because we are a diverse species.
In FOSS, documentation is a key tool of transparency and participation. You have to document everything that you do in a FOSS project, not just the code. Next year when you need to remember why a technical decision was made, the answer is coming from a combination of mailing list archives, wiki page history, and well written version control log messages. A question of why you have specific commit rules or code styles? Mailing list archive and wiki page history are your friends.
There are two main ends in the spectrum of documentation:
Content written ad hoc and in the flow of working; it captures the moment; examples are comments in source code, commit log messages, and notes taken during a meeting.
Content planned as a document of some size; it captures a version in time; it follows a more rigorous process with a higher quality result.
Part of your journey is learning when to practice each end of the spectrum. Properly done, the ad hoc just-in-time components add up to coherent whole that approaches a full document, but it usually requires a restructuring and culling of content to make it gain the higher quality.
From a practical standpoint, here's a piece of code. What does it do? Take 2 minutes and see how far you can get just by looking at the code snippet alone.
def findAllPrevious(self, name=None, attrs={}, text=None, limit=None,
                   **kwargs):
   return self._findAll(name, attrs, text, limit, self.previousGenerator,
                      **kwargs)
Even if you had written this code yourself six months ago, how likely would you be to remember what it does now?
How about this?
def findAllPrevious(self, name=None, attrs={}, text=None, limit=None,
                    **kwargs):
    """Returns all items that match the given criteria and appear
    before this Tag in the document."""
    return self._findAll(name, attrs, text, limit, self.previousGenerator,
                       **kwargs)
Now go to this link.
Which of those methods gives you the quickest idea of how to use that particular piece of code? If you had to figure out how to use this XML parsing library and make something in the next ten minutes, which level of documentation do you hope the code would have?
Apply the same thinking to the processes and proceedings of a FOSS community. If you had to find out in the next ten minutes who had done a particular commit to the code in version control and why they did it, you would want the project to use tools and processes taught in this book. Any time you want to understand why a page in Wikipedia is edited a certain way, the history and discussion buttons reveal a rich level of information and interaction that are the backbone of what makes it a useful and reliable source:
According to Wikipedia, documentation "is written text that accompanies computer software. It either explains how it operates or how to use it." For software engineering purposes, operate/use includes manipulating the source code as well as using the application. Documentation is a sanity-preserving tool for users of and potential contributors to your project, including your future self ... and perhaps your future boss or coworker.
In FOSS projects, documentation is a way of life. It is more than developer documentation in code and README files. Practicing the kind of radical transparency that makes FOSS successful means all of these things and more:
If your code is poorly commented and opaque, people know and tell you;
When ideas that become decisions are documented throughout the entire discussion, everyone can see and understand the logic; these ideas are:
You can share the burden of documentation with fellow developers, making lighter work for all;
The extra effort of documenting meetings and proceedings pays off many, many times over when:
There is also content written to document an event, such as notes for a class or technical conference, or minutes from the proceedings of a meeting. In open source projects, similar tools and processes are used in this type of documenting. Keeping transparent proceedings of meetings and similar events is a useful skill for FOSS developers.
At the end of this chapter you should be able to:
Document your project in a way that encourages other people to discover, use, and contribute to it.
Follow a good methodology for technical writing.
Write good commit log messages.
Document your code and other FOSS work as you do it.
Engage in an open collaboration on documentation, whether in source code or on a wiki.
Participate as part of a community in documenting a proceeding or event.
Explain the value of documentation to open source engineering.
Kat Walsh: "Not just encourage other people to discover and use it themselves, but make them want to share it with other people and go 'hey, look how good this is.'"
Every technical effort has a requirement for documentation. The project's ability to make writing, editing, and publishing as easy as possible is the main key to attracting and retaining contributors.
According to Mozilla, developer contributions to documentation greatly increased along with a new community of writers, editors, and translators. This all resulted from reducing the barriers to success that made even experienced developers too frustrated to document properly.
Throughout all the exercises in this book practice doing good commenting and documentation for your coding efforts.
Write thorough comments in all your source code.
Trade sources with another student and attempt to make sense of the source from the documentation alone.
Write at least one wiki page of developer documentation for each program you write or work on:
Documentation requires tools that are very similar to those used in coding.
Editor to write content in.
Means to collaborate with other writers and technical contributors.
Means to markup, build, and publish draft and finished documents.
Processes to use these tools as part of a collaboration.
Typical thinking about documentation focuses on certain parts of the tools, such as the editor (Emacs, Vi, etc.) or the markup-build-publish tools (XHTML, TeX, Docbook, etc.). A content management system (CMS) such as Drupal or Wordpress has all of the requirements built in one tool. The structure of the tooling enforces a loose, strict, or customizable process.
For example, Wordpress is a CMS that is focused on one or a group of writers producing content that appears in news fashion on a website. The tools loosely enforce a process of editing drafts, previewing, categorizing and tagging, organizing by date etc., and scheduling or pushing to publish.
For the exercises in this chapter you are going to use a classroom wiki, which simulates the wiki used for an open source project by developers and other content contributors, and also the actual wiki of an open source project you choose to document. MediaWiki is a commonly used FOSS wiki tool and is used in these exercises to assure clarity and consistency. For other wiki tools, you may need to make changes for the syntax or tool flow.
8.2.1. Exercise - Document Your Team
In this exercise you learn how to use a wiki, including page creation and editing.
Requirements:
Class wiki web service.
Wiki account or ability to make one.
Ideally an open source project makes it clear how to get edit access to the documentation tools, which may include a wiki. For this class, the instructor may have created your basic account on a classroom wiki instance.
Internet Relay Chat (IRC) room with class attending.
One hour.
Work in collaboration with other members of the class.
Your goal is to create a wiki page about yourself. It should include:
A brief biography.
Preferred contact methods and information.
A list of projects you are working on for this class.
A list of class sections completed with links to source code, logs, etc.
However, you may not write any of the content yourself.
You must work with one or more classmates to get your page created.
8.3. Five Steps for Technical Writing
Technical writing is more of a scientific process than an artistic one, which is good news. You can learn how to do it with a little practice, and there are methods you can follow. The method in this book is one that is common to good software projects, whether FOSS or not. It is a waterfall method and applies from large to small efforts, sets of books down to a five paragraph section on a wiki.:
Planning -- who is the audience? What are the book's goals?
Content -- what are the chapters about? Where will you get the information?
Writing -- first draft, review, second draft ...
Internationalisation/Localisation -- will the book be translated? Into what languages?
Review -- what worked? What didn't? How will the book be maintained?
It's called a waterfall model because if you start at the top, the results of the first step are used to move into the second step, just like water flowing down a series of steps into a pool.
You are at a point in your projects where you need to be producing some documentation. For a budding engineer this process can be a little daunting. What is the best way to tackle it? The answer is fairly simple -- start at the top of the waterfall, and let the current take you. By answering a few questions in the information plan, you can start creating a content specification. Using the chapter headings and source information you developed in the content spec, you can write the document. Once it's written, you can publish it, once it's published you can review it, and then you're ready to start again at the top with the next project.
Anyone with a scientific or engineering mind can create technical documentation, they might not enjoy it, but they are more than capable of creating it.
8.4. Exercise - Plan Your Technical Document
This exercise practices the first steps in the writing process, "Planning" and "Content":
Pick an open source project (or a subset of a project) that you think is interesting. It must be an area that you've never contributed to before.
Pick a feature that sounds tantalizing but is not clearly documented.
Proceed to figure out how to use the feature by documenting its implementation and proper usage. Focus on getting a task done with one or a few features or interfaces.
You use this planning work later in this chapter.
8.5. Using Documentation as a Way to Get Involved
Documentation has a reputation as being an easy way to begin contributing to a project. This is more true where the new contributor is already experienced or an expert in the material. It is much less likely to be true where the project has not considered how to enable good and easy documentation, or the technical content is very high.
When developers resist documenting, it is usually around several themes:
The tools are painful to use.
Writing is not a principal skill.
It takes too much time, usually because of 1 and 2.
The techniques for creating a successful documentation project that attracts contributions from actual project developers are mirrored answers to these problems:
Focus on making the tools easy to use and aligned with the developer team's preferred methods or built in to the workflow.
Turn writing in to a
brain dump , that is, an outpouring of information without concern to writing standards (grammar, spelling, or structure).
Enable non-developers to provide significant contributions by saving the developers from the actual work of writing, which is structuring and editing.
Dumping down words in to a text editor is not very hard; many developers write copiously in email, for example. The documentor's challenge is finding this content wherever it is (mailing lists, IRC discussions, random wiki pages) and editing it in to something comprehensive that reveals content holes for filling. The documentation project's success hinges on the ability to restructure rambling content and make all of that accessible to new writing contributors, so they can begin meaningful work from the very start.
A metric of this success is when any random experienced contributor is asked a question by a new contributor, and in answering, insists that the answer be documented, for example, on the project wiki using existing templates, etc. In this way new contributors are turned in to documentors who share the work burden from the existing contributors.
8.5.1. Exercise - Getting Involved
Take your technical document content plan and prepare it to show to developers and writers involved in the FOSS project.
For example, use a personal user namespace on the FOSS project's wiki "User:Username/New_page".
Alternately, prepare it for inclusion in email.
Join the documentation mailing list; if there is no specific documentation list, join the main developer list.
Send an email with your content plan and any work done so far, request comments on content and where you are getting information from.
Proceed with writing a first draft of the content based on your plan and comments received.
If you get stuck, return to the mailing list or ask on IRC. Your earlier introduction and content plan makes this part easier.
Return with your next draft to the mailing list, asking for a review and comments. Provide enough time, several days to a week, and be sure to engage in discussion about the content in a timely way (at least once per day.) The goal of this step is to improve the content in accuracy
8.6. Collaborating on Open Documentation
When working on content where developers are an important content source, keeping the tooling and processes close to the developers' existing workflow is to the documentor's advantage. It becomes possible to collaborate directly on content, even in real time. This section is where all the five steps of the waterfall flow together.
Run through this pattern for a document release:
Writer/team plans content and creates outline.
Focus on what users want to do with the software.
Create named and empty pages, such as on the wiki, as a structure for content.
Interview and write or have expert(s) braindump content in to empty structure.
Write and rewrite:
Writer/editor reorganizes structure and cuts irrelevant content.
Writer edits procedures, rewrites and edits content, noting questions for other writers and developers (in comments, wiki talk pages, etc.).
Expert reviews, fixes mistakes, fills out missing parts.
If anything is missing, cycle just the new content back through to the first step, determining where it goes then back through writing, restructuring, fact checking, and final edit.
Full edit and final proof read.
This is a release. If bugs are found (others notice problems or make suggestions), handle updates to content as per project policy.
This process takes advantage of collaboration through extreme visibility. With each step viewable in real time and as historical data, it makes it possible for an expert, an editor, or a writer to enter the workflow stream at any point and pick up the work from there. The new person can learn what has gone on before, why it has occurred (thanks to explanations in content save comments), and find a place to begin contributing very quickly.
The process also allows existing contributors to enter and leave the process easily. For example, a contributor can go on vacation for several weeks. The work continues in her absence, and when she returns, she can enter the workflow in any of the roles she is prepared for.
8.6.1. Exercise - Collaborating on a Small Document
Work with at least one other person. For this lesson you need:
It is possible to do this exercise as, for example, a series of email exchanges. The reason for using the wiki is to connect with other essentials of FOSS engineering: central collaboration, version control, and full visibility. For example, the technical expert can watch edits occur as they are saved to a wiki page, and use page version control to check what was changed and why.
One person is the technical expert, picking a topic to write about at some length without spending effort with grammar, spelling, and structure. The other persons are editors and writers; with more than one editor/writer, exchange roles equally throughout the exercise.
Waterfall step one and two:
The team writes the content plan.
Waterfall step three:
The technical expert writes in to the raw structure as quickly as possible, focusing on technical accuracy and completion of information. Do not worry about clarity to non-experts, for example. This step in the exercise expects that the expert leaves gaps of information or understanding.
The first writer passes through this content, restructuring, resolving grammar and spelling mistakes, and noting (in comments or the wiki talk page) any questions or points about understanding/clarity of the content. This editor should not rewrite any content beyond simple grammar fixes.
The first writer then reads through the content, rewriting for clarity, and drawing clear circles around the holes in the content. Holes may be assumptions the expert made about reader understanding, or steps missing in a process, for example. The writer also attempts to gain expertise through the reading; rewriting attempts should show this expertise gain, which helps the technical expert when they reappear.
At this point, other writers can intervene, collaborate directly, or do a second rewriting session.
The expert, who may have been watching and commenting on the edit stream as it occurred, enters at the end for a final review. In particular, the expert is doing the technical edit, which ensures that the facts are correct. (In practice, this role can be provided by another expert, so experts can share technical editing of each other's content.)
Do a final proofread of the document.
Publish first version in original language.
Waterfall step four:
If the project has localization (l10n) or translation guidelines, follow those. You may need to interact with a translation team, for example, or write the document in its final form in to a tool or format for translation.
Waterfall step five:
Review with developers and other FOSS project members about the process and content.
Incorporate the review results in to a plan for the next version of the document.
If your document is used again, for example when the software changes and the documentation is rewritten, a new expertise content dump and other needs can cause the writing to become unclear, gain errors, or break established voice, patterns, or structure. At that point, return with the work to the top of the waterfall.
8.7. Documenting Technical and Community Proceedings
This section is focused on reasons and methods for documenting community proceedings, such as developer conferences or technical steering group meetings.
These are the skills used by standards organizations around the world, and are very similar when used as part of the open source development model. Where open source projects might differ on the specifics of how something is done (the tools), the reasons why and the type of information captured and revealed are common across free communities.
The principles are:
Document as much as possible of what occurs in any community meetings and interactions.
Use as much automagic as possible, such as IRC logging bots.
Choose open, common, collaborative tools; not just "a wiki" but "MediaWiki, the popular and well-understood wiki system".
Use these tools in real time during the proceedings.
8.7.1. Exercise - Document Proceedings
This exercise lasts throughout the class session. It is best done early in the year to gain full benefit of the documentation that results.
Create a page on the class wiki that lists each class session by date.
For each date, assign one or more persons to be the documenter for that day.
The documenter has the job of transcribing the proceedings directly in to a wiki page named for the class session, e.g. Open Source 101 - YYYY-MM-DD session notes.
Make sure to use proper wiki syntax, categorization, etc.
Cross-link to other information, such as the instructor's published lecture notes, rather than rewriting everything. Use URLs to cite and reference.
Take notes of what other students ask and discuss.
Focus on getting down the facts, save editing and spell checking for later.
It may be hard to participate in the discussion while being a documenter.
Take turns if it helps, especially at the beginning.
Take pictures of information in the room, such as whiteboard/blackboard work.
As that page is created, it becomes the canonical node for that particular class session. For example, additional content or homework for that session could be linked from that page, etc.
A bonus exercise is this:
Use the classroom IRC to log a discussion during the class. The documenter writes notes directly in to IRC. Other class members can annotate in this back channel as they proceed.
Convert the log to HTML or otherwise make it available for linking from the wiki page.
On the wiki page, include a summary of the session and any other relevant meta-data, such as links to lecture notes, source code, test instances, and so forth.
8.8. References and Further Reading